Friday, May 29, 2009

iPhone tutorial: Creating table cells in Interface Builder


Creating complex table view cells programmatically can be quite tedious. In fact, so tedious that it can affect your creativity negatively. Thankfully, it is possible to design table view cells in Interface Builder (IB) and then use them in your application and that is what we're going to explore in this tutorial.

While designing table view cells in IB is quite simple and intuitive, using them in an application is far from intuitive. Especially if you want to use   a single table view cell for multiple (all?) rows in a table. The problem with using a cell multiple times is that you have to create multiple instances of the UITableViewCell object, which in turn means that you have to load the xib containing the object multiple times. This means that you have to create a reusable IB file (xib/nib).

How many instances do you need to create? Well, that is basically decided by the number of visible rows in the table view. Each visible row needs its own instance of a corresponding UITableViewCell object. The cell reuse scheme really won't kick in until you start scrolling the table view, so if you have a table view with 10 visible rows and 20 total rows, you will normally have to create 10 instances of the cell object. This is nothing you should rely on or try to exploit since it's the UITableView object that decides exactly how many instances you need of a specific cell. It does this by returning nil when you call 'dequeueReusableCellWIthIdentifier', which basically is an order to create a new instance - simple as that.

This tutorial could be seen as "part 4" of the "UITableView from the ground up", but I decided against it since it is more or less independent - focusing just on how to load and reuse UITableViewCell objects from an IB file. Therefore, we're going to create a new project instead of modifying the one we created in part 1.

Create the project

Start XCode and choose "File/New Project" from the menu to create a "Window-Based Application" and name it "TableCellLoader". We're going to create a few classes right away, so  select the Classes-group in the "Groups & Files" panel i XCode. Then choose "File/New File" from the menu and create a NSObject subclass called "CellOwner.m" (remember to check the "Also create h-file" checkbox). After that, choose "File/New File" again and create a UITableViewCell subclass called "Cell1" and again to create yet another UITableViewCell subclass, this time called "Cell2".

Classes/Cell1.h

The UITableViewCell we're going to create in IB will be represented by an UITableViewCell subclass in our application. We're actually going to create two similar cells in IB - "Cell1" and "Cell2" - which will only differ in regards to the layout of their contents. The cell content is very simple - two UILabels which will allow us to display two strings. Since the cells are so similiar Cell2.h will be identical toll Cell1.h - with the exception of the name of the class.

In order to access the two labels in the table view cell, we need to define two instance variables - "label" and "label2" - containing pointers to UILabel objects. Since we'll be manipulating them from IB, we also need to make them into properties and mark them with IBOutlet. Those changes should result in the following:

@interface Cell1 : UITableViewCell {
UILabel *label;
UILabel *label2;
}

@property (nonatomic, retain) IBOutlet UILabel *label;
@property (nonatomic, retain) IBOutlet UILabel *label2;

Classes/Cell1.m

Since we created this file as a subclass of UITableViewCell it will already contain some code, but ignore that for now since all we need to do right now is to synthesize the properties we created in the h-file. Since As we mentioned above "Cell1" and "Cell2" are very similar so apply the same changes to the Cell2.m.

All we need to do is to add two @synthesize statements right after the @implementation statement:

@implementation Cell1
@synthesize label;
@synthesize label2;

Classes/CellOwner.h

The CellOwner class will be used to load UITableViewCell objects from IB (xib/nib) files and the rather strange name was chosen because the CellOwner class will be set as the "File's owner" in the IB files for the UITableViewCell objects ("Cell1" and "Cell2").

Since this class is just some kind of "support" class for the IB object loading procedure it doesn't contain much or do much. All it contains is a pointer to the UITableViewCell subclass that is loaded from the IB file and a method which loads an IB file. Therefore the h-file will be quite simple:

@interface CellOwner : NSObject {
UITableViewCell *cell;
}

@property (nonatomic, retain) IBOutlet UITableViewCell *cell;

- (BOOL)loadMyNibFile:(NSString *)nibName;

Classes/CellOwner.m

Since we defined a property in the h-file, we - as always - need to add a corresponding @synthesize statement in the m-file, so add the following right after the @implementation statement:

@synthesize cell;

In the h-file we also declared a method which we need to implement in the m-file, so add the following:

- (BOOL)loadMyNibFile:(NSString *)nibName {
    // The myNib file must be in the bundle that defines self's class.
    if ([[NSBundle mainBundle] loadNibNamed:nibName owner:self options:nil] == nil)
    {
        NSLog(@"Warning! Could not load %@ file.\n", nibName);
        return NO;
    }
    return YES;
}

The source code for this method was taking more or less directly from an example in the "Resource Programming Guide" which you can find by searching for "loadMyNibFile" in the API docs in XCode (remember to select "Full-Text" in the upper left corner of the API docs window.

As you can see, it's quite simple to load an IB file - it's basically just one line of code! The rest of the code is error handling. To keep up the pace of this tutorial we won't dive into the details of the NSBundle class, so if you want to know more about that right now, please search for it in the API docs.

'loadNibNamed' takes three arguments; the name of the nib (IB) file to load, the owner of the file ("File's owner" in IB) and something called 'options'. As we said above, our single CellOwner object will be the "File's owner" of all the cells we load, which explains why we pass 'self' as the value of the 'owner' argument. The 'options' argument is only used if the IB file we load contain any non-standard "proxy objects". We don't use this feature and thus we can pass 'nil' as the value.

Classes/TableCellLoaderAppDelegate.h

Our application delegate will contain a reference to an object of the CellOwner class we created above, so add an instance variable and a property for it as well as marking it as IBOutlet since we'll create it in IB. After you're done, the file should look like this:

@interface TableCellLoaderAppDelegate : NSObject {
   UIWindow *window;
   CellOwner *cellOwner;
}

@property (nonatomic, retain) IBOutlet UIWindow *window;
@property (nonatomic, retain) IBOutlet CellOwner *cellOwner;

Classes/TableCellLoaderAppDelegate.m

This is the file we'll keep adding code to during the tutorial but right now we'll just add the @synthesize statement corresponding to the property we added in the h-file ("cellOwner"). So add the following just below the already existing "@synthesize window" statement:

@synthesize cellOwner;

Test build

Build the project in XCode (CMD-B) to verify that everything works. There should be no warnings or errors reported.

Resources/MainWindow.xib

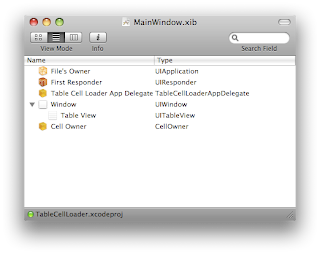
Double-click on Resources/MainWindow.xib to start IB and load the file. As always, remember to switch to "hierarchical view mode" by pressing the middle button above the "View Mode" text in the upper left corner of the MainWindow.xib window.

We need a table view in order to be able to experiment with table view cells, so let's add one to our window. Open the Library window in IB (CMD-L) and drag a "Table View" object from the "Data Views" section and drop it onto the Window object in the MainWindow.xib window.

A table view needs the help of two other objects to function properly - a 'delegate' and a 'dataSource' - so we'll need to connect those outlets of the the "Table View" object we just added. CTRL-drag from "Table View" to "Table Cell Loader App Delegate" and choose 'delegate' from the window that pops up. Repeat the process for the 'dataSource'.

We're going to use a single instance of our "CellOwner" object to load our UITableViewCell objects from IB files, so let's create that one as well. Drag a "Object" object from the "Controllers" section of the Library window (CMD-L) and drop it at the end of the list in the MainWindow.xib window. 

Select the "Object" object in MainWindow.xib and press CMD-4 to bring the Inspector window to the front and select the Identity tab. Here you should change the class of the object to "CellOwner" in the drop-down list. Remember that we added a "cellOwner" property to our application delegate? Now is the time to connect it, so CTRL-drag from "Table Cell Loader App Delegate" to "Cell Owner" in MainWindow.xib and choose "cellOwner" in the pop-up window that appears.

We're done with MainWindow.xib so save the file by pressing CMD-S.

Resources/Cell1.xib

Now it's time to create our custom UITableViewCell objects in IB, so choose "File/New" in the menu and select the "Empty" template. Select the new window that appears ("Untitled") and choose "File/Save As" from the menu. Ensure that you're in the "TableCellLoader" directory and then save the file as "Cell1". IB will ask you if you want to add the file to the project, which we do so check the checkbox and press "Add".

This file should contain the first of our UITableViewCell object, so drag a  "Table View Cell" from the "Data Views" section of the Library window (CMD-L) into the Cell1 window. The cells we're creating are UITableViewCell subclasses, so the first thing we need to do is set the class of the "Table View Cell" object by selecting it, pressing CMD-4 and select "Cell1" from the drop-down menu.

As we mentioned earlier our table view cells should contain two UILabel objects accessible through the 'label' and 'label2' properties/outlets of our Cell1 class, so let's create them. Since we want to layout the UILabel objects in a specific way we should bring up the "design window" of the "Cell1" object by double-clicking on it.

When doing this, a small table view cell shaped window should appear. Notice that the cell by default has a blue "disclosure button" to the right? We're going to use it in our tutorial so we'll keep it, but it's no problem deleting it if you want to.

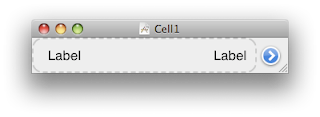
Drag a "Label" object from the "Inputs & Values" section of the Library window (CMD-L) into the design window of the Cell1 object and place it to the far left in the dashed rectangle. Drag another "Label" object from the Library window and place it to the far right in the dashed rectangle (see screenshot).

In order to be able to access these labels from our applications we need to connect them to the 'label' and 'label2' outlets we created in the Cell1.h file. To do this, CTRL-drag from the "Cell1" object in the Cell1 window to the leftmost label object in the "Cell1" design window and select the 'label' outlet in the window that pops up. Repeat the process to connect the rightmost label to the 'label2' outlet.

As we have mentioned in earlier tutorials, the table view tries to reuse its cells as a way to optimise its performance. The rationale behind this is that if object creation is kept to a minimun the performance will increase. In order for this reuse scheme to work, each "type" of cell in the table needs to be assigned a "reuse identifier". If there are two types of cells in a table there are only two different identifiers, even if the total amount of cells (rows) is much larger. The UITableViewCell property which specifies the "reuse identifier" is called 'reuseIdentifier' but here in IB it's just called "Identifier", which you can see if you select the "Cell1" object and press CMD-1. Enter "Cell1" in the Identifier field.

Now it's time to configure the "File's Owner" object. Start by changing the class to "CellOwner" since we previosly explained that "CellOwner" will be the owner of all our IB created cells. Do this by selecting "File's Onwer", press CMD-4 and choose "CellOwner" from the drop-down menu.

Once the class is set to "CellOwner" we can connect the 'cell' outlet of the "File's Owner" object to the "Cell1" object. Do this by CTRL-dragging from "File's owner" to "Cell1" and choose the 'cell' outlet from the window that pops up.

We're done with this file now, so save it by pressing CMD-S.

Resources/Cell2.xib

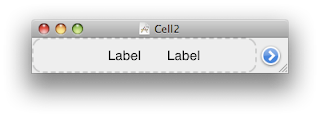
Cell2.xib is almost identical to Cell1.xib so repeat all the steps from above but lay out the UILabels a bit differently so it's possible to discern between the two cells. I chose to place the first label slightly to the left of the center of the dashed area and the second label slightly to the right instead of to the left and right extremes (see screenshot).

When you're done with all the connections, class changes, etc. remember to save the file by pressing CMD-S. 

A nice way of seeing if all the files in IB are saved is to activate the "Window" in IB and look at the list of window names at the end of the menu. Unsaved windows have a small dot the left of the name, so if you've save all windows you should see no dots.

Classes/TableCellLoaderAppDelegate.m

Now it's time to return to XCode to implement the required methods of the UITableViewDelegate and UITableViewDataSource protocols since we connected the 'delegate' and 'dataSource' outlets of our "Table View" object in IB to the "Table Cell Loader App Delegate" object which is implemented in TableCellLoaderAppDelegate.m.

We're going to work with the Cell1 and Cell2 classes so start by importing the corresponding h-files by adding the following right after the already existing #import statement:

#import "Cell1.h"
#import "Cell2.h"

After that we should configure the number of rows in our table by adding the following just below the already present 'dealloc' method:

- (NSInteger)tableView:(UITableView *)tableView numberOfRowsInSection:(NSInteger)section {
return 20;
}

Finally, we're coming to the really interesting part of this tutorial - how to provide our custom made, IB designed UITableViewCell objects to the table view. We do this adding a quite impressive 'cellForRowAtIndexPath' method just below the 'numberOfRowsInSection' method.

- (UITableViewCell *)tableView:(UITableView *)tableView cellForRowAtIndexPath:(NSIndexPath *)indexPath {
// init the return value to nil
UITableViewCell *cell = nil;
if ( (indexPath.row & 1) == 0 ) {
// "even rows", that is, row 0, row 2, row 4, etc.
// check if the table view has a cell of the appropriate type we can reuse
Cell1 *cell1 = (Cell1 *)[tableView dequeueReusableCellWithIdentifier:@"Cell1"];
if ( cell1 != nil ) {
// yes it had a cell we could reuse
NSLog(@"reusing cell '%@' (%p) for row %d...", cell1.reuseIdentifier, cell1, indexPath.row);
} else {
// no cell to reuse, we have to create a new instance by loading it from the IB file
NSString *nibName = @"Cell1";
[cellOwner loadMyNibFile:nibName];
// get a pointer to the loaded cell from the cellOwner and cast it to the appropriate type
cell1 = (Cell1 *)cellOwner.cell;
NSLog(@"Loading cell from nib %@", nibName);
}
// set the labels to the appropriate text for this row
cell1.label.text = [NSString stringWithFormat:@"this is..."];
cell1.label2.text = [NSString stringWithFormat:@"...row %d", indexPath.row];
cell = cell1;
} else {
// "odd rows", that is, row 1, row 3, row 5, etc.
// check if the table view has a cell of the appropriate type we can reuse
Cell2 *cell2 = (Cell2 *)[tableView dequeueReusableCellWithIdentifier:@"Cell2"];
if ( cell2 != nil ) {
// yes it had a cell we could reuse
NSLog(@"reusing cell '%@' (%p) for row %d...", cell2.reuseIdentifier, cell2, indexPath.row);
} else {
// no cell to reuse, we have to create a new instance by loading it from the IB file
NSString *nibName = @"Cell2";
[cellOwner loadMyNibFile:nibName];
// get a pointer to the loaded cell from the cellOwner and cast it to the appropriate type
cell2 = (Cell2 *)cellOwner.cell;
NSLog(@"Loading cell from nib %@", nibName);
}
// set the labels to the appropriate text for this row
cell2.label.text = [NSString stringWithFormat:@"this is..."];
cell2.label2.text = [NSString stringWithFormat:@"...row %d", indexPath.row];
cell = cell2;
}

// return the cell which will be either a "Cell1" or "Cell2" object.
return cell;
}

I have tried to explain what's going on in the inlined comments so I won't bore you with repeating all that here in the text. Instead I think we're more than ready to see some results - yeah, it's time for a test run!

Test run

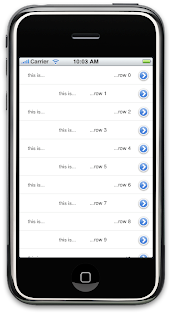
Build and run the project in XCode by pressing CMD-Return and once the simulator have started you should see a table where the "even rows" have one appearance and the "odd rows" another. Try to scroll down until you get to row 19 where the table ends. If you switch back to XCode and bring the console window to the front (CMD-R) you should see something like this.

2009-05-29 09:56:37.479 TableCellLoader[14364:20b] Loading cell from nib Cell1 for row 10...
2009-05-29 09:56:37.488 TableCellLoader[14364:20b] Loading cell from nib Cell2 for row 9...
2009-05-29 09:56:37.491 TableCellLoader[14364:20b] Loading cell from nib Cell1 for row 8...
2009-05-29 09:56:37.493 TableCellLoader[14364:20b] Loading cell from nib Cell2 for row 7...
2009-05-29 09:56:37.497 TableCellLoader[14364:20b] Loading cell from nib Cell1 for row 6...
2009-05-29 09:56:37.501 TableCellLoader[14364:20b] Loading cell from nib Cell2 for row 5...
2009-05-29 09:56:37.508 TableCellLoader[14364:20b] Loading cell from nib Cell1 for row 4...
2009-05-29 09:56:37.513 TableCellLoader[14364:20b] Loading cell from nib Cell2 for row 3...
2009-05-29 09:56:37.522 TableCellLoader[14364:20b] Loading cell from nib Cell1 for row 2...
2009-05-29 09:56:37.525 TableCellLoader[14364:20b] Loading cell from nib Cell2 for row 1...
2009-05-29 09:56:37.527 TableCellLoader[14364:20b] Loading cell from nib Cell1 for row 0...
2009-05-29 09:56:39.434 TableCellLoader[14364:20b] Loading cell from nib Cell2 for row 11...
2009-05-29 09:56:39.514 TableCellLoader[14364:20b] reusing cell 'Cell1' (0x52d780) for row 12...
2009-05-29 09:56:39.610 TableCellLoader[14364:20b] reusing cell 'Cell2' (0x52d200) for row 13...
2009-05-29 09:56:40.001 TableCellLoader[14364:20b] reusing cell 'Cell1' (0x52c870) for row 14...
2009-05-29 09:56:40.082 TableCellLoader[14364:20b] reusing cell 'Cell2' (0x52c360) for row 15...
2009-05-29 09:56:40.154 TableCellLoader[14364:20b] reusing cell 'Cell1' (0x52c0e0) for row 16...
2009-05-29 09:56:40.482 TableCellLoader[14364:20b] reusing cell 'Cell2' (0x52bb60) for row 17...
2009-05-29 09:56:40.543 TableCellLoader[14364:20b] reusing cell 'Cell1' (0x52b610) for row 18...
2009-05-29 09:56:40.576 TableCellLoader[14364:20b] Loading cell from nib Cell2 for row 19...
2009-05-29 09:56:42.298 TableCellLoader[14364:20b] reusing cell 'Cell1' (0x528fd0) for row 10...
2009-05-29 09:56:42.448 TableCellLoader[14364:20b] reusing cell 'Cell2' (0x526280) for row 9...

As we have seen in earlier tutorials, no reusal of cell is going on for the first rows since they all are visible and every visible row needs its own UITableViewCell instance. Once we start scrolling, the reuse scheme kicks into effect though. It's not just the first rows that have their own instances though. As you can see row 19 was also loaded/created from the IB file (nib).

Adding interaction

If you want to interact with the cells (detecting row selection or "disclosure button" touches) you can add the following to TableCellLoaderAppDelegate.m:

- (void)tableView:(UITableView *)tableView accessoryButtonTappedForRowWithIndexPath:(NSIndexPath *)indexPath {
NSLog(@"accessoryButtonTappedForRowWithIndexPath: row=%d", indexPath.row);
}

- (void)tableView:(UITableView *)tableView didSelectRowAtIndexPath:(NSIndexPath *)indexPath {
NSLog(@"didSelectRowAtIndexPath: row=%d", indexPath.row);
[tableView deselectRowAtIndexPath:indexPath animated:YES];
}

This won't do anything else but log some messages in the XCode console window, but it opens up a world of possibilities. It also demonstrates that the "disclosure button" added by default by IB works right out of the box.

Summary

There are many ways of using Interface Builder created table cells in your application but the procedure I have presented here in this tutorial is quite simple to understand, at least for a novice iPhone developer like myself . Remember that things I write about in this blogs are things that I have recently began understanding myself! That is, I am no expert and don't claim to present the best, or even correct, way of doing things. What I'm trying to say is that I welcome all kinds of comments! ;)

Tuesday, May 26, 2009

iPhone tutorial: UITableView from the ground up, part 3

Now that we understand the really basic stuff about the UITableView and UITableViewCell classes, we're ready to move on to some simple interaction. We'll continue modifying the Table1 project from part 1 and part 2 so please check those parts out before reading any further.

Classes/Table1AppDelegate.m

Modify the 'cellForRowAtIndexPath' method to make it look like this:

- (UITableViewCell *)tableView:(UITableView *)tableView cellForRowAtIndexPath:(NSIndexPath *)indexPath {

// try to retrieve "cell 1" from the UITableView cache
UITableViewCell *cell = [tableView dequeueReusableCellWithIdentifier:@"cell 1"];
if ( cell == nil ) {
// "cell 1" wasn't present in the cache, so create it
cell = [[UITableViewCell alloc] initWithFrame:CGRectZero reuseIdentifier:@"cell 1"];
cell.accessoryType = UITableViewCellAccessoryDetailDisclosureButton;
NSLog(@"creating cell '%@' (%p) for row %d...", cell.reuseIdentifier, cell, indexPath.row);
} else {
// "cell 1" was present in the cache, so log that we're reusing it
NSLog(@"reusing cell '%@' (%p) for row %d...", cell.reuseIdentifier, cell, indexPath.row);
}
  
cell.text = [NSString stringWithFormat:@"this is row %d", indexPath.row];
return cell;
}

The only new thing here really is the 

cell.accessoryType = UITableViewCellAccessoryDetailDisclosureButton;

row which says that we want a standard "detail disclosure" button to the right of the text in our cell. This is the standard way in the iPhone user interface to indicate that touching this cell will take you to a new screen. Just by adding this you also instruct the table view to start sending 'accessoryButtonTappedForRowWithIndexPath' to its 'delegate' object.

In order to receive those messages we have to implement the appropriate method, so add the following to the end of the file.

- (void)tableView:(UITableView *)tableView accessoryButtonTappedForRowWithIndexPath:(NSIndexPath *)indexPath {
NSLog(@"accessoryButtonTappedForRowWithIndexPath: row=%d", indexPath.row);
}

A short note on the use of indexPath in combination with table views

You might have noticed that a lot of the delegate methods for the table view have an 'indexPath' argument of type NSIndexPath. I wrote quite a lot about index paths in a previous post so have a look there if you want a full explanation. Here I will just mention that the index paths used in conjunction with table views have two levels which represent the section and the row indices of the table. As an alternative solution two arguments 'section' and 'row' could have been used instead of the 'indexPath' argument. If the table only has one section all you need to care about is the row index, which you read from the indexPath.row property. 

Test run

Build and run the project in XCode (CMD-Return), wait for the simulator to start and then go back to XCode to bring the XCode console window to the front (CMD-R). Touch a few disclosure buttons and you should see something like this in the console window:

009-05-26 17:07:24.807 Table1-2[11521:20b] accessoryButtonTappedForRowWithIndexPath: row=0
2009-05-26 17:07:27.655 Table1-2[11521:20b] accessoryButtonTappedForRowWithIndexPath: row=1
2009-05-26 17:07:29.471 Table1-2[11521:20b] accessoryButtonTappedForRowWithIndexPath: row=2
2009-05-26 17:07:30.943 Table1-2[11521:20b] accessoryButtonTappedForRowWithIndexPath: row=3
2009-05-26 17:07:35.919 Table1-2[11521:20b] accessoryButtonTappedForRowWithIndexPath: row=8

What you do with these messages is completely up to you, but a very common way of using this information is to switch to another table view which shows information "on the next level" in some kind of hierarchical data. You often see this when table views are used together with navigation controllers since they offer a very easy way of switching to a new view as well as providing a way to get back to the last one (the "back button").

Classes/Table1AppDelegate.m

Another way of adding interaction to a table is by detecting "selections", that is detecting that the user touched a row/cell in the table. Above we detected that the user touched the "disclosure button", but here we'll detect touches to anywhere outside of the disclosure button. Add the following to the end of the file.

- (void)tableView:(UITableView *)tableView didSelectRowAtIndexPath:(NSIndexPath *)indexPath {
NSLog(@"didSelectRowAtIndexPath: row=%d", indexPath.row);
}

Test run

Build and run the project and touch a few rows once the simulator has started. You should see something like this in the XCode console window:

2009-05-26 17:12:00.289 Table1-2[11530:20b] didSelectRowAtIndexPath: row=1
2009-05-26 17:12:02.770 Table1-2[11530:20b] didSelectRowAtIndexPath: row=2
2009-05-26 17:12:03.882 Table1-2[11530:20b] didSelectRowAtIndexPath: row=5
2009-05-26 17:12:05.322 Table1-2[11530:20b] didSelectRowAtIndexPath: row=8

If you are really observant you probably noticed that the row you touched stays selected (as indicated by the blue colour). This is because it is our responsibility to deselect it, which is accomplished by calling 'deselectRowAtIndexPath':

- (void)tableView:(UITableView *)tableView didSelectRowAtIndexPath:(NSIndexPath *)indexPath {
NSLog(@"didSelectRowAtIndexPath: row=%d", indexPath.row);
[tableView deselectRowAtIndexPath:indexPath animated:YES];
}

Summary

Allowing the user to interact with the table view opens up for a lot of possibilities and it is nice to know that the detection of user interactions is as easy as this. At least for simple interactions.

Sunday, May 24, 2009

iPhone tutorial: UITableView from the ground up, part 2

In part 1 of this tutorial we created a simple table view with just a few lines of code to show that, even though table views are a bit intimidating, they are possible to fully understand if you take small enough steps. This part of the tutorial is going to continue from where the last part ended, so if you haven't already created the "Table1" XCode project you will have to work through part 1 first.

Classes/Table1AppDelegate.m

We're going to start by exploring how to reuse cells, since this is something Apple more or less recommends us to do. The first hint Apple gives us is that there is only one way to initialise a UITableViewCell and that involves calling 'initWithFrame:reuseIdentifier' which takes a "reuse identifier" as the second argument. You can set this to nil - as we did in part 1 - if you really don't want to reuse the cell, but that will probably affect the performance of (large) table views significally.

The table view calls it's 'dataSource' delegate whenever it needs a cell for a specific row since it has no clue of how a specific cell (row) should look like (background colour, detail disclosure buttons, etc.) or what it should contain (text, images, etc.). However, if you  assign a "reuse identifier" (name) to the cell you provide to the table view, the table view will try to cache the cell for you. This means that the table view tries to store the cells created by the "data source" for later use so that the data source doesn' t have to create a new cell everytime - sometimes it will be able to reuse an existing cell.

The UITableView class has a method called 'dequeueReuseableCellWithIdentifier' which is used to retrieve a UITableViewCell object from the UITableView cache, if present. If the cell isn't present, it returns nil. Let's modify our 'tableView:cellForRowAtIndexPath' method to make use of this reuse-scheme. We'll call our cell "cell1" in the example below:

- (UITableViewCell *)tableView:(UITableView *)tableView cellForRowAtIndexPath:(NSIndexPath *)indexPath {

// try to retrieve "cell1" from the UITableView cache
UITableViewCell *cell = [tableView dequeueReusableCellWithIdentifier:@"cell1"];
if ( cell == nil ) {
// "cell 1" wasn't present in the cache, so create it
NSLog(@"creating cell for row %d...", indexPath.row);
cell = [[UITableViewCell alloc] initWithFrame:CGRectZero reuseIdentifier:@"cell1"];
} else {
// "cell 1" was present in the cache, so log that we're reusing it
NSLog(@"reusing cell for row %d...", indexPath.row);
}

if ( indexPath.row == 0 ) { 
// assign a text to row 0
cell.text = [NSString stringWithFormat:@"this is row %d", indexPath.row];
}
return cell;
}

The comments in the source code above tries to explain what we're doing, so I won't elaborate on that. One thing is worth mentioning though and that is the 'indexPath.row' statement. If you look in the API docs for NSIndexPath you won't see any 'row' property. This is because "UITableView declares a category on NSIndexPath that enables you to get the represented row index (row property)", as can be read in the API docs for the UITableViewDelegate protocol. The "category" that is mentioned above is an Obejctive C feature which allows you to add methods to a class without actually subclassing it.

Exploring the reuse scheme

If you compile and run (CMD-Return) in XCode and wait for the simulator to start, you'll see a table with the text "this is row 0" in the first row. Apart from that it is empty, but you are still able to select rows 1 and 2 as well. If you check the console window (CMD-R) in XCode, you'll see somthing like this:

2009-05-24 18:29:06.375 Table1-2[8618:20b] creating cell for row 2...
2009-05-24 18:29:06.387 Table1-2[8618:20b] creating cell for row 1...
2009-05-24 18:29:06.394 Table1-2[8618:20b] creating cell for row 0...

The first thing to notice is that UITableView seems to have requested cells in the "wrong order", that is starting with row 2 instead of row 0. This is of course nothing you should take advantage of, but it's interesting to note. The really interesting thing to note, though, is that none of the cells seems to have been reused, even though we initialised all our cells with the same reuse identfier "cell1". What's going on, is the reuse mechanism broken or what?

Adding more rows

Let's see what happens if we change the number of rows in our table by editing 'tableView:numberOfRowsInSection' to make it return 10 instead of 3.

- (NSInteger)tableView:(UITableView *)tableView numberOfRowsInSection:(NSInteger)section {
return 10;
}

Build and run (CMD-Return), wait for the simulator to start and then bring the XCode console window to the front (CMD-R). Now scroll the table view by "moving your finger upwards" on the simulator and you should see something like this in the console window:

2009-05-24 18:44:49.417 Table1-2[8663:20b] creating cell for row 9...
2009-05-24 18:44:49.425 Table1-2[8663:20b] creating cell for row 8...
2009-05-24 18:44:49.426 Table1-2[8663:20b] creating cell for row 7...
2009-05-24 18:44:49.427 Table1-2[8663:20b] creating cell for row 6...
2009-05-24 18:44:49.431 Table1-2[8663:20b] creating cell for row 5...
2009-05-24 18:44:49.434 Table1-2[8663:20b] creating cell for row 4...
2009-05-24 18:44:49.435 Table1-2[8663:20b] creating cell for row 3...
2009-05-24 18:44:49.435 Table1-2[8663:20b] creating cell for row 2...
2009-05-24 18:44:49.436 Table1-2[8663:20b] creating cell for row 1...
2009-05-24 18:44:49.436 Table1-2[8663:20b] creating cell for row 0...
2009-05-24 18:45:25.892 Table1-2[8663:20b] reusing cell for row 1...
2009-05-24 18:45:25.975 Table1-2[8663:20b] reusing cell for row 0...
2009-05-24 18:45:39.922 Table1-2[8663:20b] reusing cell for row 0...
2009-05-24 18:45:41.884 Table1-2[8663:20b] reusing cell for row 0...
2009-05-24 18:45:42.053 Table1-2[8663:20b] reusing cell for row 1...
2009-05-24 18:45:42.187 Table1-2[8663:20b] reusing cell for row 0...
2009-05-24 18:45:43.552 Table1-2[8663:20b] reusing cell for row 1...
2009-05-24 18:45:43.566 Table1-2[8663:20b] reusing cell for row 0...

As you can see, the 10 first rows are created without reusing any cells, but as soon as you start scrolling the reuse mechanism seems to kick in. Everytime row 0, 1 and 2 "reappears" the cells seem to be reused.

Adding even more rows

Wonder what happens if 'tableView:numberOfRowsInSection' returns 100 instead of 10? Edit the method, build and run (CMD-Return), wait for the simulator to start, bring the XCode console window to the front (CMD-R), start scrolling around and you should see somthing like this:

2009-05-24 18:54:22.903 Table1-2[8704:20b] creating cell for row 10...
2009-05-24 18:54:22.926 Table1-2[8704:20b] creating cell for row 9...
2009-05-24 18:54:22.932 Table1-2[8704:20b] creating cell for row 8...
2009-05-24 18:54:22.939 Table1-2[8704:20b] creating cell for row 7...
2009-05-24 18:54:22.947 Table1-2[8704:20b] creating cell for row 6...
2009-05-24 18:54:22.951 Table1-2[8704:20b] creating cell for row 5...
2009-05-24 18:54:22.953 Table1-2[8704:20b] creating cell for row 4...
2009-05-24 18:54:22.955 Table1-2[8704:20b] creating cell for row 3...
2009-05-24 18:54:22.962 Table1-2[8704:20b] creating cell for row 2...
2009-05-24 18:54:22.964 Table1-2[8704:20b] creating cell for row 1...
2009-05-24 18:54:22.968 Table1-2[8704:20b] creating cell for row 0...
2009-05-24 18:54:38.025 Table1-2[8704:20b] reusing cell for row 10...
2009-05-24 18:54:40.375 Table1-2[8704:20b] creating cell for row 11...
2009-05-24 18:54:40.526 Table1-2[8704:20b] reusing cell for row 12...
2009-05-24 18:54:41.365 Table1-2[8704:20b] reusing cell for row 13...
2009-05-24 18:54:42.043 Table1-2[8704:20b] reusing cell for row 14...
2009-05-24 18:54:42.136 Table1-2[8704:20b] reusing cell for row 15...
2009-05-24 18:54:42.693 Table1-2[8704:20b] reusing cell for row 16...
2009-05-24 18:54:42.857 Table1-2[8704:20b] reusing cell for row 17...
2009-05-24 18:54:43.040 Table1-2[8704:20b] reusing cell for row 18...
2009-05-24 18:54:43.374 Table1-2[8704:20b] reusing cell for row 19...

Wow, now there is a lot of reusing going on! It seems as if the cells that appears for the first time when scrolling also are resued. That's why you see that rows 12 to 19 are reused. If you're really observant, you'll also notice something strange in the simulator. The text "this is row 0" appears in more than one place! What a nasty bug!! Hey, take it easy, it might not be a bug, just some proof of that the cell really is reused.

Insights into the reuse scheme

If the text "this is row 0" had appeared for all reused cells, I would have been able to explain this, but now I don't really understand it. I'm guessing it has to do with the fact that we're creating cells for row 0 to 11 with the same identifier. After that we start reusing cells and since there are more than one cell with the same identifier we sometimes get the row-0 instance, sometime the row-1 instance, and so on up to row-11 instance. After that we get the row-0 instance again, and so on.

If we modify the 'tableView:cellForRowAtIndexPath' to make output the cell 'reuseIdentifier' property as well as the pointer to the object we see that this guess might be true.

- (UITableViewCell *)tableView:(UITableView *)tableView cellForRowAtIndexPath:(NSIndexPath *)indexPath {

// try to retrieve "cell1" from the UITableView cache
UITableViewCell *cell = [tableView dequeueReusableCellWithIdentifier:@"cell1"];
if ( cell == nil ) {
// "cell 1" wasn't present in the cache, so create it
cell = [[UITableViewCell alloc] initWithFrame:CGRectZero reuseIdentifier:@"cell1"];
NSLog(@"creating cell '%@' (%p) for row %d...", cell.reuseIdentifier, cell, indexPath.row);
} else {
// "cell 1" was present in the cache, so log that we're reusing it
NSLog(@"reusing cell '%@' (%p) for row %d...", cell.reuseIdentifier, cell, indexPath.row);
}

if ( indexPath.row == 0 ) { 
// assign a text to row 0
cell.text = [NSString stringWithFormat:@"this is row %d", indexPath.row];
}
return cell;
}

If you run the modified version you'll see somthing like this:

2009-05-24 20:12:51.907 Table1-2[8919:20b] creating cell 'cell1' (0x5284c0) for row 10...
2009-05-24 20:12:51.917 Table1-2[8919:20b] creating cell 'cell1' (0x5293c0) for row 9...
2009-05-24 20:12:51.929 Table1-2[8919:20b] creating cell 'cell1' (0x5287e0) for row 8...
2009-05-24 20:12:51.930 Table1-2[8919:20b] creating cell 'cell1' (0x526560) for row 7...
2009-05-24 20:12:51.931 Table1-2[8919:20b] creating cell 'cell1' (0x5292f0) for row 6...
2009-05-24 20:12:51.934 Table1-2[8919:20b] creating cell 'cell1' (0x528940) for row 5...
2009-05-24 20:12:51.937 Table1-2[8919:20b] creating cell 'cell1' (0x5297d0) for row 4...
2009-05-24 20:12:51.938 Table1-2[8919:20b] creating cell 'cell1' (0x520970) for row 3...
2009-05-24 20:12:51.939 Table1-2[8919:20b] creating cell 'cell1' (0x529940) for row 2...
2009-05-24 20:12:51.940 Table1-2[8919:20b] creating cell 'cell1' (0x529a60) for row 1...
2009-05-24 20:12:51.941 Table1-2[8919:20b] creating cell 'cell1' (0x529be0) for row 0...
2009-05-24 20:13:08.380 Table1-2[8919:20b] creating cell 'cell1' (0x52e290) for row 11...
2009-05-24 20:13:09.190 Table1-2[8919:20b] reusing cell 'cell1' (0x529be0) for row 12...
2009-05-24 20:13:09.517 Table1-2[8919:20b] reusing cell 'cell1' (0x529a60) for row 13...
2009-05-24 20:13:52.790 Table1-2[8919:20b] reusing cell 'cell1' (0x529940) for row 2...
2009-05-24 20:13:53.415 Table1-2[8919:20b] reusing cell 'cell1' (0x529940) for row 14...
2009-05-24 20:13:53.511 Table1-2[8919:20b] reusing cell 'cell1' (0x520970) for row 15...
2009-05-24 20:13:54.068 Table1-2[8919:20b] reusing cell 'cell1' (0x5297d0) for row 16...
2009-05-24 20:13:54.106 Table1-2[8919:20b] reusing cell 'cell1' (0x528940) for row 17...
2009-05-24 20:13:54.568 Table1-2[8919:20b] reusing cell 'cell1' (0x5292f0) for row 18...
2009-05-24 20:13:54.635 Table1-2[8919:20b] reusing cell 'cell1' (0x526560) for row 19...
2009-05-24 20:13:54.652 Table1-2[8919:20b] reusing cell 'cell1' (0x5287e0) for row 20...
2009-05-24 20:13:54.710 Table1-2[8919:20b] reusing cell 'cell1' (0x5293c0) for row 21...
2009-05-24 20:13:54.743 Table1-2[8919:20b] reusing cell 'cell1' (0x5284c0) for row 22...
2009-05-24 20:13:54.776 Table1-2[8919:20b] reusing cell 'cell1' (0x52e290) for row 23...
2009-05-24 20:13:54.810 Table1-2[8919:20b] reusing cell 'cell1' (0x529be0) for row 24...
2009-05-24 20:13:54.860 Table1-2[8919:20b] reusing cell 'cell1' (0x529a60) for row 25...
2009-05-24 20:13:54.893 Table1-2[8919:20b] reusing cell 'cell1' (0x529940) for row 26...
2009-05-24 20:13:54.943 Table1-2[8919:20b] reusing cell 'cell1' (0x520970) for row 27...
2009-05-24 20:13:54.993 Table1-2[8919:20b] reusing cell 'cell1' (0x5297d0) for row 28...
2009-05-24 20:13:55.060 Table1-2[8919:20b] reusing cell 'cell1' (0x528940) for row 29...
2009-05-24 20:13:55.126 Table1-2[8919:20b] reusing cell 'cell1' (0x5292f0) for row 30...
2009-05-24 20:13:55.193 Table1-2[8919:20b] reusing cell 'cell1' (0x526560) for row 31...
2009-05-24 20:13:55.293 Table1-2[8919:20b] reusing cell 'cell1' (0x5287e0) for row 32...
2009-05-24 20:13:55.393 Table1-2[8919:20b] reusing cell 'cell1' (0x5293c0) for row 33...
2009-05-24 20:13:55.543 Table1-2[8919:20b] reusing cell 'cell1' (0x5284c0) for row 34...
2009-05-24 20:13:55.726 Table1-2[8919:20b] reusing cell 'cell1' (0x52e290) for row 35...
2009-05-24 20:13:56.043 Table1-2[8919:20b] reusing cell 'cell1' (0x529be0) for row 36...
2009-05-24 20:13:57.194 Table1-2[8919:20b] reusing cell 'cell1' (0x529a60) for row 37...

If you study the output closely - especially the pointers within the parentheses - you'll see that the cells are reused in a recurring pattern. This suggests that all the 'cell1' UITableViewCell objects are placed on a circular queue inside UITableView. Once a cell has been removed from the head of  the queue and reused it is placed at the tail of the queue again. That a queue is used in the "cache" implementation is further suggested by the method name 'dequeueReusableCellWithIdentifier' since "dequeue" is a fancier way of saying "remove from the head".

Resetting cell contents before reuse

The solution to all these "strange" problems is to reset the contents of a reused cell before returning it to the table view. In our case that means setting the 'text' property every time - both for newly created cells and for reused cells.

- (UITableViewCell *)tableView:(UITableView *)tableView cellForRowAtIndexPath:(NSIndexPath *)indexPath {

// try to retrieve "cell1" from the UITableView cache
UITableViewCell *cell = [tableView dequeueReusableCellWithIdentifier:@"cell1"];
if ( cell == nil ) {
// "cell 1" wasn't present in the cache, so create it
cell = [[UITableViewCell alloc] initWithFrame:CGRectZero reuseIdentifier:@"cell1"];
NSLog(@"creating cell '%@' (%p) for row %d...", cell.reuseIdentifier, cell, indexPath.row);
} else {
// "cell 1" was present in the cache, so log that we're reusing it
NSLog(@"reusing cell '%@' (%p) for row %d...", cell.reuseIdentifier, cell, indexPath.row);
}

// reset cell contents
cell.text = [NSString stringWithFormat:@"this is row %d", indexPath.row];
return cell;
}

Summary

Ok, now we have digged further down into the world of the UITableView class and hopefully it's even less frightening now that we have examined how the cell reuse scheme works. We're still very sloppy with our memory management - in fact, we're completely ignoring it - so bear in mind that these small tests are just that - small tests to increase our understanding.