Showing posts with label interface builder. Show all posts

Tuesday, September 1, 2009

iphone tutorial: Memory management - autorelease and NIB files

In this tutorial we're going to dive a bit deeper into Cocoa memory management, specifically looking at a feature called autorelease. If you haven't read the first part of the memory management tutorial, it's highly recommended that you do.


Cocoa memory ownership rules


In the first part of this tutorial we introduced the concept of memory ownership. To help deciding who actually owns a memory block, the Cocoa designers have developed a set of rules that all Cocoa classes and applications should follow. This set of rules can be found in the "Memory Management Programming Guide for Cocoa":


---

To make sure it is clear when you own an object and when you do not, and what responsibilities you have as an owner, Cocoa sets the following policy:


You own any object you create.

You “create” an object using a method whose name begins with “alloc” or “new” or contains “copy” (for example, alloc, newObject, or mutableCopy).


If you own an object, you are responsible for relinquishing ownership when you have finished with it. You relinquish ownership of an object by sending it a release message or an autorelease message (autorelease is discussed in more detail in “Delayed Release”). In Cocoa terminology, relinquishing ownership of an object is typically referred to as “releasing” an object.


If you do not own an object, you must not release it.

---


If you think these rules are too complicated to remember, try to at least remember the naming scheme; methods beginning with "alloc" or "new" or contains "copy" creates an object (and returns a reference to that object) that you are responsible for freeing. That is, these methods, transfer the ownership to you, the caller of the moethod.


A new concept is also introduced; autorelease or "delayed release". If you call 'autorelease' on an object reference, that object won't be released immediately, but "later". Before we explain what later means, it might be good to understand why there is such a feature as a "delayed release".


Autorelease


Why would you want to release an object later instead of now or not at all? One example is when you have a method that creates objects for someone else than itself.


(MyClass.m)

+(MyClass *)createObject {

MyClass *reference = [[MyClass alloc] init];

return reference;

}


The method 'createObject' in the class MyClass allocates and initialises a MyClass object and then returns the reference to the newly created object. An application calling this method


(MyApplication.m)

MyClass *myClass = [MyClass createObject];


would not be responsible for releasing the object since the 'createObject' method name doesn't contain any of the "magic words" listed in the rules above. The 'createObject' method on the other hand calls 'alloc' which is a magic word and is therefore responsible for calling release.


It's impossible to call 'release' on the created object after the return statement and 'release' is called before the return statement, the object will be deallocated and the method will return a reference to a deallocated object which will lead to chaos. So when should 'release' be called? Well, "later"...


Here "later" means "after the return statement" and late enough so that the caller of the method gets a chance to store the returned release in a variable (or somewhere else) and call 'retain' on it.


This is where the autorelease mechanism steps in and provides a solution. If the method creating the object calls 'autorelease' on the reference instead of 'release' evertyhing will work; the method has fulfilled its responsibility to release the object it created and the caller of the method gets a chance to call retain on the returned object.


(MyClass.m)

+(MyClass *)createObject {

MyClass *reference = [[MyClass alloc] init];

[reference autorelease]; // call autorelease on the newly create object

return reference;

}


(MyApplication.m)

MyClass *myClass = [MyClass createObject];

[myClass retain]; // call retain on the returned object to protect it from being deallocated


The autorelease method can be called anywhere the release method should have been called but just as with release it's important to call it the right number of times; for each time 'autorelease' is called 'release' will be called "later".


NIB files


We mentioned above that a method that creates an object for someone else is a typical user of the autorelease functionality. Another user of autorelease is a NIB file, or actually the method that load it. A NIB file contains a graph of objects where most objects are connected to each other using outlets. When the loader method rebuilds this object graph in memory, using the NIB file as a blueprint, it creates all objects with a reference count of 1 and then autorelease them.


When the connections between the objects are re-established, the loader method calls setter methods of the objects, which should retain the object reference if they want to prevent the newly loaded object from being deallocated. Ownership is transferred to these objects, meaning that the objects also are responsible for releasing the references in their 'dealloc' method. Setter methods for outlets are normally synthesized using the @property/@synthesize mechanism of Objective C.


@property (nonatomic, retain) IBOutlet someClass *someOutlet;


The 'retain' keyword of the property declaration will ensure that the corresponding setter method created by the @synthesize keyword will retain the reference passed to it.


However, there are also top-level objects in the file that have no natural owner. If you want to keep those objects around, which you normally do, you have to manually retain them (and then later manually releasing them). But how do you get hold of the references to them if they have no "owners"? Well, they do actually get a temporary owner during the loading process; references to all the top-level objects are stored in an array, returned by the 'loadNibNamed:owner:options' method.


As a simple alternative to iterating through the array and retain all the objects in it individually you could retain the array itself instead (and then later release it). This works since it prevents the array from being (auto) released and deallocated - if it was it would release all the references stored in it (decreasing the reference count to zero) and thus force all the objects in the array to be deallocated.


NSArray *nibArray = [[NSBundle mainBundle] loadNibNamed:@"Nib1" owner:self options:nil];

if ( nibArray == nil ) {

NSLog(@"loadNibNamed failed");

return;

}

[nibArray retain];


NIB files with "unconnected" top-level objects aren't that common since it would be useless to define a lot of objects in a NIB that no one uses. Much more common is that the top-level objects are connected to outlets in the "File's owner" object. When that is the case you don't have to worry about implicitly retaining the objects since they will be retained by the setter methods in the "File's owner".


Friday, May 29, 2009

iPhone tutorial: Creating table cells in Interface Builder


Creating complex table view cells programmatically can be quite tedious. In fact, so tedious that it can affect your creativity negatively. Thankfully, it is possible to design table view cells in Interface Builder (IB) and then use them in your application and that is what we're going to explore in this tutorial.

While designing table view cells in IB is quite simple and intuitive, using them in an application is far from intuitive. Especially if you want to use   a single table view cell for multiple (all?) rows in a table. The problem with using a cell multiple times is that you have to create multiple instances of the UITableViewCell object, which in turn means that you have to load the xib containing the object multiple times. This means that you have to create a reusable IB file (xib/nib).

How many instances do you need to create? Well, that is basically decided by the number of visible rows in the table view. Each visible row needs its own instance of a corresponding UITableViewCell object. The cell reuse scheme really won't kick in until you start scrolling the table view, so if you have a table view with 10 visible rows and 20 total rows, you will normally have to create 10 instances of the cell object. This is nothing you should rely on or try to exploit since it's the UITableView object that decides exactly how many instances you need of a specific cell. It does this by returning nil when you call 'dequeueReusableCellWIthIdentifier', which basically is an order to create a new instance - simple as that.

This tutorial could be seen as "part 4" of the "UITableView from the ground up", but I decided against it since it is more or less independent - focusing just on how to load and reuse UITableViewCell objects from an IB file. Therefore, we're going to create a new project instead of modifying the one we created in part 1.

Create the project

Start XCode and choose "File/New Project" from the menu to create a "Window-Based Application" and name it "TableCellLoader". We're going to create a few classes right away, so  select the Classes-group in the "Groups & Files" panel i XCode. Then choose "File/New File" from the menu and create a NSObject subclass called "CellOwner.m" (remember to check the "Also create h-file" checkbox). After that, choose "File/New File" again and create a UITableViewCell subclass called "Cell1" and again to create yet another UITableViewCell subclass, this time called "Cell2".

Classes/Cell1.h

The UITableViewCell we're going to create in IB will be represented by an UITableViewCell subclass in our application. We're actually going to create two similar cells in IB - "Cell1" and "Cell2" - which will only differ in regards to the layout of their contents. The cell content is very simple - two UILabels which will allow us to display two strings. Since the cells are so similiar Cell2.h will be identical toll Cell1.h - with the exception of the name of the class.

In order to access the two labels in the table view cell, we need to define two instance variables - "label" and "label2" - containing pointers to UILabel objects. Since we'll be manipulating them from IB, we also need to make them into properties and mark them with IBOutlet. Those changes should result in the following:

@interface Cell1 : UITableViewCell {
UILabel *label;
UILabel *label2;
}

@property (nonatomic, retain) IBOutlet UILabel *label;
@property (nonatomic, retain) IBOutlet UILabel *label2;

Classes/Cell1.m

Since we created this file as a subclass of UITableViewCell it will already contain some code, but ignore that for now since all we need to do right now is to synthesize the properties we created in the h-file. Since As we mentioned above "Cell1" and "Cell2" are very similar so apply the same changes to the Cell2.m.

All we need to do is to add two @synthesize statements right after the @implementation statement:

@implementation Cell1
@synthesize label;
@synthesize label2;

Classes/CellOwner.h

The CellOwner class will be used to load UITableViewCell objects from IB (xib/nib) files and the rather strange name was chosen because the CellOwner class will be set as the "File's owner" in the IB files for the UITableViewCell objects ("Cell1" and "Cell2").

Since this class is just some kind of "support" class for the IB object loading procedure it doesn't contain much or do much. All it contains is a pointer to the UITableViewCell subclass that is loaded from the IB file and a method which loads an IB file. Therefore the h-file will be quite simple:

@interface CellOwner : NSObject {
UITableViewCell *cell;
}

@property (nonatomic, retain) IBOutlet UITableViewCell *cell;

- (BOOL)loadMyNibFile:(NSString *)nibName;

Classes/CellOwner.m

Since we defined a property in the h-file, we - as always - need to add a corresponding @synthesize statement in the m-file, so add the following right after the @implementation statement:

@synthesize cell;

In the h-file we also declared a method which we need to implement in the m-file, so add the following:

- (BOOL)loadMyNibFile:(NSString *)nibName {
    // The myNib file must be in the bundle that defines self's class.
    if ([[NSBundle mainBundle] loadNibNamed:nibName owner:self options:nil] == nil)
    {
        NSLog(@"Warning! Could not load %@ file.\n", nibName);
        return NO;
    }
    return YES;
}

The source code for this method was taking more or less directly from an example in the "Resource Programming Guide" which you can find by searching for "loadMyNibFile" in the API docs in XCode (remember to select "Full-Text" in the upper left corner of the API docs window.

As you can see, it's quite simple to load an IB file - it's basically just one line of code! The rest of the code is error handling. To keep up the pace of this tutorial we won't dive into the details of the NSBundle class, so if you want to know more about that right now, please search for it in the API docs.

'loadNibNamed' takes three arguments; the name of the nib (IB) file to load, the owner of the file ("File's owner" in IB) and something called 'options'. As we said above, our single CellOwner object will be the "File's owner" of all the cells we load, which explains why we pass 'self' as the value of the 'owner' argument. The 'options' argument is only used if the IB file we load contain any non-standard "proxy objects". We don't use this feature and thus we can pass 'nil' as the value.

Classes/TableCellLoaderAppDelegate.h

Our application delegate will contain a reference to an object of the CellOwner class we created above, so add an instance variable and a property for it as well as marking it as IBOutlet since we'll create it in IB. After you're done, the file should look like this:

@interface TableCellLoaderAppDelegate : NSObject {
   UIWindow *window;
   CellOwner *cellOwner;
}

@property (nonatomic, retain) IBOutlet UIWindow *window;
@property (nonatomic, retain) IBOutlet CellOwner *cellOwner;

Classes/TableCellLoaderAppDelegate.m

This is the file we'll keep adding code to during the tutorial but right now we'll just add the @synthesize statement corresponding to the property we added in the h-file ("cellOwner"). So add the following just below the already existing "@synthesize window" statement:

@synthesize cellOwner;

Test build

Build the project in XCode (CMD-B) to verify that everything works. There should be no warnings or errors reported.

Resources/MainWindow.xib

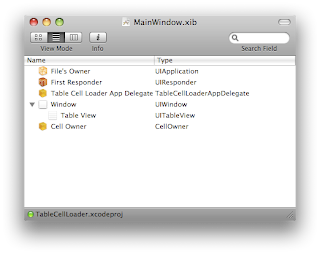
Double-click on Resources/MainWindow.xib to start IB and load the file. As always, remember to switch to "hierarchical view mode" by pressing the middle button above the "View Mode" text in the upper left corner of the MainWindow.xib window.

We need a table view in order to be able to experiment with table view cells, so let's add one to our window. Open the Library window in IB (CMD-L) and drag a "Table View" object from the "Data Views" section and drop it onto the Window object in the MainWindow.xib window.

A table view needs the help of two other objects to function properly - a 'delegate' and a 'dataSource' - so we'll need to connect those outlets of the the "Table View" object we just added. CTRL-drag from "Table View" to "Table Cell Loader App Delegate" and choose 'delegate' from the window that pops up. Repeat the process for the 'dataSource'.

We're going to use a single instance of our "CellOwner" object to load our UITableViewCell objects from IB files, so let's create that one as well. Drag a "Object" object from the "Controllers" section of the Library window (CMD-L) and drop it at the end of the list in the MainWindow.xib window. 

Select the "Object" object in MainWindow.xib and press CMD-4 to bring the Inspector window to the front and select the Identity tab. Here you should change the class of the object to "CellOwner" in the drop-down list. Remember that we added a "cellOwner" property to our application delegate? Now is the time to connect it, so CTRL-drag from "Table Cell Loader App Delegate" to "Cell Owner" in MainWindow.xib and choose "cellOwner" in the pop-up window that appears.

We're done with MainWindow.xib so save the file by pressing CMD-S.

Resources/Cell1.xib

Now it's time to create our custom UITableViewCell objects in IB, so choose "File/New" in the menu and select the "Empty" template. Select the new window that appears ("Untitled") and choose "File/Save As" from the menu. Ensure that you're in the "TableCellLoader" directory and then save the file as "Cell1". IB will ask you if you want to add the file to the project, which we do so check the checkbox and press "Add".

This file should contain the first of our UITableViewCell object, so drag a  "Table View Cell" from the "Data Views" section of the Library window (CMD-L) into the Cell1 window. The cells we're creating are UITableViewCell subclasses, so the first thing we need to do is set the class of the "Table View Cell" object by selecting it, pressing CMD-4 and select "Cell1" from the drop-down menu.

As we mentioned earlier our table view cells should contain two UILabel objects accessible through the 'label' and 'label2' properties/outlets of our Cell1 class, so let's create them. Since we want to layout the UILabel objects in a specific way we should bring up the "design window" of the "Cell1" object by double-clicking on it.

When doing this, a small table view cell shaped window should appear. Notice that the cell by default has a blue "disclosure button" to the right? We're going to use it in our tutorial so we'll keep it, but it's no problem deleting it if you want to.

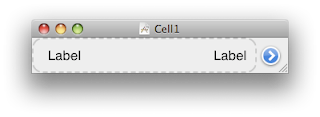
Drag a "Label" object from the "Inputs & Values" section of the Library window (CMD-L) into the design window of the Cell1 object and place it to the far left in the dashed rectangle. Drag another "Label" object from the Library window and place it to the far right in the dashed rectangle (see screenshot).

In order to be able to access these labels from our applications we need to connect them to the 'label' and 'label2' outlets we created in the Cell1.h file. To do this, CTRL-drag from the "Cell1" object in the Cell1 window to the leftmost label object in the "Cell1" design window and select the 'label' outlet in the window that pops up. Repeat the process to connect the rightmost label to the 'label2' outlet.

As we have mentioned in earlier tutorials, the table view tries to reuse its cells as a way to optimise its performance. The rationale behind this is that if object creation is kept to a minimun the performance will increase. In order for this reuse scheme to work, each "type" of cell in the table needs to be assigned a "reuse identifier". If there are two types of cells in a table there are only two different identifiers, even if the total amount of cells (rows) is much larger. The UITableViewCell property which specifies the "reuse identifier" is called 'reuseIdentifier' but here in IB it's just called "Identifier", which you can see if you select the "Cell1" object and press CMD-1. Enter "Cell1" in the Identifier field.

Now it's time to configure the "File's Owner" object. Start by changing the class to "CellOwner" since we previosly explained that "CellOwner" will be the owner of all our IB created cells. Do this by selecting "File's Onwer", press CMD-4 and choose "CellOwner" from the drop-down menu.

Once the class is set to "CellOwner" we can connect the 'cell' outlet of the "File's Owner" object to the "Cell1" object. Do this by CTRL-dragging from "File's owner" to "Cell1" and choose the 'cell' outlet from the window that pops up.

We're done with this file now, so save it by pressing CMD-S.

Resources/Cell2.xib

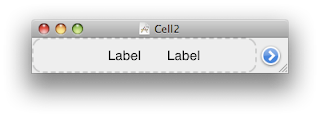
Cell2.xib is almost identical to Cell1.xib so repeat all the steps from above but lay out the UILabels a bit differently so it's possible to discern between the two cells. I chose to place the first label slightly to the left of the center of the dashed area and the second label slightly to the right instead of to the left and right extremes (see screenshot).

When you're done with all the connections, class changes, etc. remember to save the file by pressing CMD-S. 

A nice way of seeing if all the files in IB are saved is to activate the "Window" in IB and look at the list of window names at the end of the menu. Unsaved windows have a small dot the left of the name, so if you've save all windows you should see no dots.

Classes/TableCellLoaderAppDelegate.m

Now it's time to return to XCode to implement the required methods of the UITableViewDelegate and UITableViewDataSource protocols since we connected the 'delegate' and 'dataSource' outlets of our "Table View" object in IB to the "Table Cell Loader App Delegate" object which is implemented in TableCellLoaderAppDelegate.m.

We're going to work with the Cell1 and Cell2 classes so start by importing the corresponding h-files by adding the following right after the already existing #import statement:

#import "Cell1.h"
#import "Cell2.h"

After that we should configure the number of rows in our table by adding the following just below the already present 'dealloc' method:

- (NSInteger)tableView:(UITableView *)tableView numberOfRowsInSection:(NSInteger)section {
return 20;
}

Finally, we're coming to the really interesting part of this tutorial - how to provide our custom made, IB designed UITableViewCell objects to the table view. We do this adding a quite impressive 'cellForRowAtIndexPath' method just below the 'numberOfRowsInSection' method.

- (UITableViewCell *)tableView:(UITableView *)tableView cellForRowAtIndexPath:(NSIndexPath *)indexPath {
// init the return value to nil
UITableViewCell *cell = nil;
if ( (indexPath.row & 1) == 0 ) {
// "even rows", that is, row 0, row 2, row 4, etc.
// check if the table view has a cell of the appropriate type we can reuse
Cell1 *cell1 = (Cell1 *)[tableView dequeueReusableCellWithIdentifier:@"Cell1"];
if ( cell1 != nil ) {
// yes it had a cell we could reuse
NSLog(@"reusing cell '%@' (%p) for row %d...", cell1.reuseIdentifier, cell1, indexPath.row);
} else {
// no cell to reuse, we have to create a new instance by loading it from the IB file
NSString *nibName = @"Cell1";
[cellOwner loadMyNibFile:nibName];
// get a pointer to the loaded cell from the cellOwner and cast it to the appropriate type
cell1 = (Cell1 *)cellOwner.cell;
NSLog(@"Loading cell from nib %@", nibName);
}
// set the labels to the appropriate text for this row
cell1.label.text = [NSString stringWithFormat:@"this is..."];
cell1.label2.text = [NSString stringWithFormat:@"...row %d", indexPath.row];
cell = cell1;
} else {
// "odd rows", that is, row 1, row 3, row 5, etc.
// check if the table view has a cell of the appropriate type we can reuse
Cell2 *cell2 = (Cell2 *)[tableView dequeueReusableCellWithIdentifier:@"Cell2"];
if ( cell2 != nil ) {
// yes it had a cell we could reuse
NSLog(@"reusing cell '%@' (%p) for row %d...", cell2.reuseIdentifier, cell2, indexPath.row);
} else {
// no cell to reuse, we have to create a new instance by loading it from the IB file
NSString *nibName = @"Cell2";
[cellOwner loadMyNibFile:nibName];
// get a pointer to the loaded cell from the cellOwner and cast it to the appropriate type
cell2 = (Cell2 *)cellOwner.cell;
NSLog(@"Loading cell from nib %@", nibName);
}
// set the labels to the appropriate text for this row
cell2.label.text = [NSString stringWithFormat:@"this is..."];
cell2.label2.text = [NSString stringWithFormat:@"...row %d", indexPath.row];
cell = cell2;
}

// return the cell which will be either a "Cell1" or "Cell2" object.
return cell;
}

I have tried to explain what's going on in the inlined comments so I won't bore you with repeating all that here in the text. Instead I think we're more than ready to see some results - yeah, it's time for a test run!

Test run

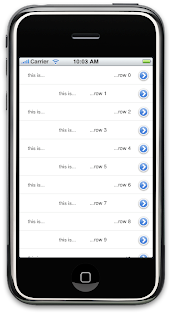
Build and run the project in XCode by pressing CMD-Return and once the simulator have started you should see a table where the "even rows" have one appearance and the "odd rows" another. Try to scroll down until you get to row 19 where the table ends. If you switch back to XCode and bring the console window to the front (CMD-R) you should see something like this.

2009-05-29 09:56:37.479 TableCellLoader[14364:20b] Loading cell from nib Cell1 for row 10...
2009-05-29 09:56:37.488 TableCellLoader[14364:20b] Loading cell from nib Cell2 for row 9...
2009-05-29 09:56:37.491 TableCellLoader[14364:20b] Loading cell from nib Cell1 for row 8...
2009-05-29 09:56:37.493 TableCellLoader[14364:20b] Loading cell from nib Cell2 for row 7...
2009-05-29 09:56:37.497 TableCellLoader[14364:20b] Loading cell from nib Cell1 for row 6...
2009-05-29 09:56:37.501 TableCellLoader[14364:20b] Loading cell from nib Cell2 for row 5...
2009-05-29 09:56:37.508 TableCellLoader[14364:20b] Loading cell from nib Cell1 for row 4...
2009-05-29 09:56:37.513 TableCellLoader[14364:20b] Loading cell from nib Cell2 for row 3...
2009-05-29 09:56:37.522 TableCellLoader[14364:20b] Loading cell from nib Cell1 for row 2...
2009-05-29 09:56:37.525 TableCellLoader[14364:20b] Loading cell from nib Cell2 for row 1...
2009-05-29 09:56:37.527 TableCellLoader[14364:20b] Loading cell from nib Cell1 for row 0...
2009-05-29 09:56:39.434 TableCellLoader[14364:20b] Loading cell from nib Cell2 for row 11...
2009-05-29 09:56:39.514 TableCellLoader[14364:20b] reusing cell 'Cell1' (0x52d780) for row 12...
2009-05-29 09:56:39.610 TableCellLoader[14364:20b] reusing cell 'Cell2' (0x52d200) for row 13...
2009-05-29 09:56:40.001 TableCellLoader[14364:20b] reusing cell 'Cell1' (0x52c870) for row 14...
2009-05-29 09:56:40.082 TableCellLoader[14364:20b] reusing cell 'Cell2' (0x52c360) for row 15...
2009-05-29 09:56:40.154 TableCellLoader[14364:20b] reusing cell 'Cell1' (0x52c0e0) for row 16...
2009-05-29 09:56:40.482 TableCellLoader[14364:20b] reusing cell 'Cell2' (0x52bb60) for row 17...
2009-05-29 09:56:40.543 TableCellLoader[14364:20b] reusing cell 'Cell1' (0x52b610) for row 18...
2009-05-29 09:56:40.576 TableCellLoader[14364:20b] Loading cell from nib Cell2 for row 19...
2009-05-29 09:56:42.298 TableCellLoader[14364:20b] reusing cell 'Cell1' (0x528fd0) for row 10...
2009-05-29 09:56:42.448 TableCellLoader[14364:20b] reusing cell 'Cell2' (0x526280) for row 9...

As we have seen in earlier tutorials, no reusal of cell is going on for the first rows since they all are visible and every visible row needs its own UITableViewCell instance. Once we start scrolling, the reuse scheme kicks into effect though. It's not just the first rows that have their own instances though. As you can see row 19 was also loaded/created from the IB file (nib).

Adding interaction

If you want to interact with the cells (detecting row selection or "disclosure button" touches) you can add the following to TableCellLoaderAppDelegate.m:

- (void)tableView:(UITableView *)tableView accessoryButtonTappedForRowWithIndexPath:(NSIndexPath *)indexPath {
NSLog(@"accessoryButtonTappedForRowWithIndexPath: row=%d", indexPath.row);
}

- (void)tableView:(UITableView *)tableView didSelectRowAtIndexPath:(NSIndexPath *)indexPath {
NSLog(@"didSelectRowAtIndexPath: row=%d", indexPath.row);
[tableView deselectRowAtIndexPath:indexPath animated:YES];
}

This won't do anything else but log some messages in the XCode console window, but it opens up a world of possibilities. It also demonstrates that the "disclosure button" added by default by IB works right out of the box.

Summary

There are many ways of using Interface Builder created table cells in your application but the procedure I have presented here in this tutorial is quite simple to understand, at least for a novice iPhone developer like myself . Remember that things I write about in this blogs are things that I have recently began understanding myself! That is, I am no expert and don't claim to present the best, or even correct, way of doing things. What I'm trying to say is that I welcome all kinds of comments! ;)

Saturday, May 9, 2009

iPhone tutorial: "Exitable" user interface, part 2 - delegation using a protocol

Here is another unplanned "part 2". After writing the last post I felt that the "piece of magic" I used to make the tab bar controller disappear so that we would return to the "primary screen" was a bit too quick and dirtyish. If you don't remember what piece of magic I'm talking about it was this piece of code:

Multi2AppDelegate *multiAppDelegate = (Multi2AppDelegate *)[[UIApplication sharedApplication] delegate];
[multiAppDelegate buttonPressed:sender];

Just that I refered to it as magic probably made you think that it wasn't completely kosher. In the iPhone and Objective C world you usually solve a problem like this using "delegation". If the word delegation sounds familiar to you, it's probably because most iPhone applications have a file where the word delegate appears in the name of the file. This, in turn, is because the UIApplication object has a 'delegate' property which it uses to inform another object of certain important things that are happening in the application.

Well, we have a similar situation in our little application. We want to signal that we want to exit the secondary user interface - the tab bar and its view controllers - when the user presses the "Done"-button. This is also an important thing that happens and that another object want to know about. In our case we want to know about it in order to be able to make the secondary interface disappear so that we can return to the primary interface.

Since the situations are similar, perhaps we should use "delegation" here as well? If we check the API docs for the UIApplication class in XCode we see that the 'delegate' property is defined like this:
@property(nonatomic, assign) id<UIApplicationDelegate> delegate

The type of the property is 'id', which is the Objective C way of saying that we want a pointer to a generic object. Notice that we don't have to use an astersik character (*) in the specification even though this is a pointer - that's a Objective C convenience thing. But what is the UIApplicationDelegate stuff between the less than and greater than characters? That's the name of a Objective C "protocol", which, simply put, is a set of methods that a class has to implement. So the strange looking declaration for 'delegate' can be interpreted as "delegate is a pointer to an object which implements the UIApplicationDelegate protocol".

Item1ViewController.h

We want to define a 'delegate' property for our Item1ViewController class so that someone interested in knowing what's happening in the view controller can put a pointer to itself in the 'delegate' property. Edit the file so that it looks like this (some things are omitted here):
@protocol Item1ViewControllerDelegate
-(void)doneButtonPressed;
@end

@interface Item1ViewController : UIViewController {
id<Item1ViewControllerDelegate> delegate;
}

@property (nonatomic, retain) IBOutlet id<Item1ViewControllerDelegate> delegate;

-(IBAction)buttonPressed:(id)sender;

@end


In the beginning of the file we define a protocol called 'Item1ViewControllerDelegate', which contains a single method declaration for a method called 'doneButtonPressed'. Apparently, the only thing we think that someone might be interested to know about us is that the "Done"-button has been pressed. After this we declare a variable called 'delegate' which should point to an object implementing the protocol we just defined. We also make this variable into a property and mark it with IBOutlet so that we can manipulate it from Interface Builder (IB). The rest is unchanged from before.

Item1ViewController.m

Since we added a property declaration in the h-file, we need to implement in the m-file. We do this by adding the following to the top of the file, right after the @implementation-line.

@synthesize delegate;

After this, we should re-write the 'buttonPressed' method to make it look like this:

-(IBAction)buttonPressed:(id)sender {
UIButton *button = (UIButton *)sender;
NSLog(@"Item1ViewController:buttonPressed:sender=%p, title=%@", sender, button.currentTitle);
if ( [button.currentTitle compare:@"Done"] == NSOrderedSame ) {
// Multi2AppDelegate *multiAppDelegate = (Multi2AppDelegate *)[[UIApplication sharedApplication] delegate];
// [multiAppDelegate buttonPressed:sender];
[delegate doneButtonPressed];
}
}

We have commented out the two lines containing the UIApplication magic and replaced it with a single line which calls the 'doneButtonPressed' method of the 'delegate' object (pointer). Instead of calling a method of a specific object - the one that the UIApplication's 'delegate' property points to - we call the method of an unspecified object - the one that our 'delegate' property points to. This gives us much more freedom in choosing which object that will react to the pressing of the "Done"-button. Instead of having to use the UIApplication delegate object we can use any object.

Using "callbacks" like this is often referred to as loose coupling, meaning that the sender and receiver of the message (caller and callee of the method) doesn't need to know that much about eachother. The only thing they do need to know about is that both implement the same protocol (or interface).

If you wonder how we dared calling a method on the 'delegate' object before checking if it was set, that's because it's allowed to send messages to (call methods of) the "nil object".

MultiAppDelegate.m

The whole reason of introducing delegation in Item1ViewController was to be able to implement the "Done"-button functionality in any object instead of in the UIApplication's 'delegate' object. But, in order to keep this part of the tutorial short, we will use it anyway, so edit the 'buttonPressed' method and add a new method called 'doneButtonPressed'. After you edit the file, it should look like this:

-(IBAction)buttonPressed:(id)sender {
UIButton *button = (UIButton *)sender;
NSLog(@"MultiAppDelegate: buttonPressed:sender=%p, title=%@", sender, button.currentTitle);
if ( [button.currentTitle compare:@"TabBar"] == NSOrderedSame ) {
[window addSubview:[tabBarController view]];
// } else if ( [button.currentTitle compare:@"Done"] == NSOrderedSame ) {
// [[tabBarController view] removeFromSuperview];
}
}

// Item1ViewControllerDelegate protocol implementation

-(void)doneButtonPressed {
NSLog(@"doneButtonPressed");
[[tabBarController view] removeFromSuperview];
}

In 'buttonPressed', we have commented out the quick and dirty version of the code which removed the tab bar controller view if a button named "Done" was pressed. We have replaced this with an implementation of the Item1ViewControllerDelegate protocol, which consists of the single method 'doneButtonPressed'. We now removed the tab bar controller in this new method instead.

MainWindow.xib

Since we have defined the MultiAppDelegate and Item1ViewController objects in the same IB-file, it becomes very easy to make the 'delegate' property of the ItemViewController point to MultiAppDelegate. Just CTRL-drag from the view controller to the app delegate and select the 'delegate' outlet in the window that pops up.

That's it, we have replaced our quick and dirty solution with a very well behaved delegation implementation! Beautiful, and very professional looking, huh? Delegation can actually be used for other stuff than informing another object of what's going on. It can also be used to control another object, for example to instruct a generic object of what to display. That's how the 'dataSource' in an UITableView works, but that's outside the scope of this tutorial ;)

Thursday, May 7, 2009

iPhone tutorial: Creating an "exitable" user interfaces

Many iPhone applications have a single user interface which you cannot "exit" - it's displayed all the time. It can still be quite complex with multiple level navigation controllers and table views, multiple tabs in a tab controller, or even a combination of a tab bar controller and navigation controllers, but still, you see the tab / navigation bar all the time. There is no exit.

The XCode "Utility Application" template, the iPhone stocks and weather applications are some examples of a different breed of applications. They have a "primary screen" which displays some information and might even allow you to interact with it. When you need to change a setting or something similar you bring up the "secondary screen", which is a traditional iPhone user interface with all the well known components. You can say that this kind of application has multiple interfaces, which you can switch between or exit from.

In this tutorial, we're going to create a simple multi-interface application. It will consist of a primary screen with a single button on it which takes us to a secondary screen with a tab bar controller with a single tab. The view of the single tab will also have a single button which "exits" the interface and takes us back to the main screen.

Start XCode and choose "File/New project" from the menu and create a "Window-Based Application" called "Multi". This will create a project with the following structure:

Multi
  Classes
    MultiAppDelegate.[hm]
  Resources
    MainWindow.xib

Primary screen

To keep the project small, we'll use the application delegate to implement the primary screen. The delegate will also function as the central point of our application which switches between the primary and secondary screen. We will also "cheat" a little and won't use a view controller for this screen because it is so simple and the main intent with this tutorial is to demonstrate how to "exit" an user interface. The only thing the primary screen will have to handle is to detect that a button was pressed so that it can switch between the primary and secondary screen.

MultiAppDelegate.h

@interface MultiAppDelegate : NSObject {
UIWindow *window;
UITabBarController *tabBarController;
}

@property (nonatomic, retain) IBOutlet UIWindow *window;
@property (nonatomic, retain) IBOutlet UITabBarController *tabBarController;

-(IBAction)buttonPressed:(id)sender;

Edit the file to make it look like above. We added the 'tabBarController' pointer and made it into a property and marked it with IBOutlet to make it accessible from Interface Builder (IB). We'll use this to keep track of the tab bar controller we will create. We also added an IBAction called 'buttonPressed:'. Notice the colon (:) at the end of the name? That's Objective C's way of saying that this method takes one argument. Since we're dealing with an iPhone "action" this argument is the sender of the action, which in our case will be an UIButton.

MultiAppDelegate.m

Instruct the compiler to create the accessors (set/get) for our 'tabBarController' property by editing the top of the file to make it look like this:

@synthesize window;
@synthesize tabBarController;

Implement the IBAction method by editing the bottom of the file to make it look like this:

-(IBAction)buttonPressed:(id)sender {
UIButton *button = (UIButton *)sender;
NSLog(@"MultiAppDelegate: buttonPressed:sender=%p, title=%@", sender, button.currentTitle);
if ( [button.currentTitle compare:@"TabBar"] == NSOrderedSame ) {
[window addSubview:[tabBarController view]];
} else if ( [button.currentTitle compare:@"Done"] == NSOrderedSame ) {
[[tabBarController view] removeFromSuperview];
}
}
@end

The first line converts the generic 'sender' pointer into a specific pointer 'button' of the type UIButton. After that we add some diagnostic logging so that we can see (in the XCode console window) that the method has been called. Then comes an if-clause that checks the title of the button that was pressed. If it was "TabBar" we make the 'tabBarController' appear by adding its view to our window. If it was "Done" we remove the 'tabBarController' view from its superview by, quite logically, calling removeFromSuperview and thus make it disappear.

Did you notice that we didn't do anything in 'applicationDidFinishLaunching'? That's where we usually makes our user interface appear by adding a subview to our window, but now that won't happen until we press a button.

Secondary screen

As we said initially, the secondary screen will consist of a tab bar controller with a single tab, or "item" as they are called in the iPhone, and thus a single view controller. Create the view controller's source code files by selecting the "Classes" group in XCode's "Groups & Files" section and choose "File/New file" from the menu. Select "UIViewController Subclass" and name the file Item1ViewController.m and ensure that "also create h-file" is enabled. This will create the following files.

Item1ViewController.h

@interface Item1ViewController : UIViewController {

}

-(IBAction)buttonPressed:(id)sender;

The only change we made to this was to add the IBAction 'buttonPressed:' (once again notice the colon which indicates that this method takes one argument). This action will be generated by our "exit"-button which will take us back to the primary screen.

Item1ViewController.m

At the top of the file, add a a new import-statement under the existing import-statement:

#import "MultiAppDelegate.h"

At the end of the file, just before the @end marker add the following:

-(IBAction)buttonPressed:(id)sender {
UIButton *button = (UIButton *)sender;
NSLog(@"Item1ViewController:buttonPressed:sender=%p, title=%@", sender, button.currentTitle);
if ( [button.currentTitle compare:@"Done"] == NSOrderedSame ) {
Multi2AppDelegate *multiAppDelegate = (Multi2AppDelegate *)[[UIApplication sharedApplication] delegate];
[multiAppDelegate buttonPressed:sender];
}
}

This method starts out in the same way as the identically named method in MultiAppDelegate.m; we create a 'button' pointer from the generic 'sender' pointer and log a diagnostic message to the XCode console window to indicate that the method has been called. We then check if the title of the pressed button was "Done" and if it was we do some magic!

The intention of this magic is to get hold of a pointer to our MultiAppDelegate object. We do this by first getting hold of a pointer to our UIApplication object by calling a "class-method" of the UIApplication class called 'sharedApplication'. Once we have this pointer we can get hold of our UIApplication's delegate by calling 'delegate' on it. This, in turn, gives us another pointer - pointing to our MultiAppDelegate object - and since we know that our delegate is of the type MultiAppDelegate we cast the delegate pointer to that type. After this, we have a pointer to our MultiAppDelegate object in 'multiAppDelegate' - neat, huh?

After that we can call MultiAppDelegate's method 'buttonPressed:' just as if we have had setup a property for it and connected the MultiAppDelegate object to it in IB. This would have been impossible in IB since we modularised the interface into two xib-files instead of one, so thanks Apple for making this magic possible ;)

But why do we want to call 'buttonPressed:' in MultiAppDelegate when we could handle the buttonPressed action here in Item1ViewController? That's because only MultiAppDelegate has the possibility to remove the tab bar controller. Here in Item1ViewController, we're "one level down" and doesn't really know that we are inside a tab bar controller. Thus we need to "step up one level" where we have a better overview of our application and can see clearly that a tab bar controller actually exists. When going to UIApplication we actually do more than step up one level, we actually go to the absolute top of our application where we have a complete overview of everything that's going on. This makes UIApplication, or as in this case, it's delegate the perfect "central controlling point" of the application.

Speaking of this, I stumbled across an old discussion thread debating how to do "central control" like this. It's quite informative, so put it on your reading list.

Letting the "Done"-button inform both Item1ViewController and MultiAppDelegate instead of just MultiAppDelegate gives Item1ViewController a chance to "clean up and finish" before MuliAppDelegate removes it from its view.

Designing the interfaces

Now that we have created the source code for our classes, it's time to tie everything together in Interface Builder (IB) as well as add the buttons, tab controllers, etc. 

MainWindow.xib

Double-click on Resources/MainWindow.xib in XCode to start IB and make it load the xib-file. As always, switch to "hierarchical view mode" in IB by pressing the middle button above the text "View mode" in the MainWindow.xib window.

Button

We start by adding the button which will make the secondary user interface appear. If you're really observant, you might have noticed that the title of this button has to be "TabBar" since that's what we're comparing against in the 'buttonPressed:' method in MultiAppDelegate. So, bring up the Library window (CMD-L) and drag a "Rounded Rect Button" from the "Inputs & Values" section in the Library window and drop it on top of the Window-object in the MainWindow.xib window. The button should appear under the Window-object, indented one level and a small arrow should be added to the left of the Window-object to indicate that it "contains something".

Double-click on the "Rounded Rect Button" object to bring up the edit window. The button should appear in the center of the window. Now double-click the button in the edit-window and enter the text "TabBar". Return to MainWindow.xib and CTRL-drag from "Rounded Rect Button" to "Mutli App Delegate" and release the mouse button. A window called 'Events' should pop-up and allow you to select 'buttonPressed:' (once again, notice the colon at the end). Select it, and you have made the "Multi App Delegate" object the target of the button's default action. This default action is sent whenever the button is pressed.

Tab Bar Controller

Now we should add the tab bar controller which will function as our secondary user interface, so drag a "Tab Bar Controller" from the "Controllers" section of the Library window to the MainWindow.xib window and drop it at the end of the list. Immediately expand the hierarchy under the controller by pressing the small arrow which is located to the left of the "Tab Bar Controller" object in the list in MainWindow.xib. See that it contains two view controllers? That's because a tab bar controller by default has two tabs, sorry, items. In this example we should only use one, so select the second view controller and press backspace.

Our application delegate should handle this tab bar controller, so CTRL-drag from the delegate to the tab bar controller and connect the 'tabBarController' outlet/property.

Item1ViewController.xib

To make things a bit more modular, we should create a separate xib for the view controller, or actually its contents; the views, buttons, etc. Do this by choosing "File/New" from the IB menu and select the "View" template. Start by saving the file by choosing "File/Save as" from the menu. Navigate to the directory containing your project files and save the file as "Item1ViewController" (the xib-extension will be added automatically). IB will bring up a window asking if you want to add the file to your project. We do so check the checkbox and click the Add-button.

Go back to XCode and verify that the file has appeared in our project. It should be located at the end of the list of files under the "Multi" group - just above the "Targets"-group. We want it in the Resources group, so drag the xib-file into it. Build the project (CMD-B) and XCode prompts you to save the changes - do that.

Return to IB by double-clicking on Resources/MainWindow.xib. Locate the MainWindow.xib window in IB and select the "Selected View Controller" object. Press CMD-1 to bring up the Attributes tab of the Inspector window and choose Item1ViewController from the "NIB Name" drop-down menu. This tells IB that the contents of this view controller should be loaded from that file. Thus, we shouldn't add any contents to the view controller here in MainWindow.xib. 

However, if you expand the view controller by pressing the small arrow to the left of it, you'll see that it already contains a "Tab Bar Item" but that's ok because that object is a bit special. It's used to control the appearance of this view controller on the tab bar, so you could say that it's part of the configuration for the tab bar controller rather than the view controller.

As the final modularisation step, select the "Selected View Controller", press CMD-4 and select "Item1ViewController" from the Class drop-down menu so that IB will create our UIViewController subclass instead of a generic UIViewController.

Simulated metrics

Locate the Item1ViewController.xib window in IB and select the "View" object. This view will be displayed "inside" a tab bar controller and will thus not have access to the full display of the iPhone, since the bottom part of the display will be covered by the tab bar controller. If we would have designed this view in MainWindow.xib instead of modularising it into its own xib-file this would have been handled automatically for us, but now we need to "simulate" it. Therefore, after selecting the "View" object, press CMD-1 and you'll see that there is a section called "View Simulated Bar Metrics", which is exactly what we're looking for. Choose "Tab Bar" from the "Bottom Bar" drop-down menu. If you double-click on the "View" object in the Item1ViewController.xib window you'll see that a an empty black bar now has appeared at the bottom of the edit-window. This helps us avoid this area when placing buttons, etc, since they otherwise would be obscured by the tab bar.

"Exit" button

While we have the edit-window at the front, we should take the opportunity to add our "Exit" button to the view. This button should tell the application that we're done using the secondary user interface and want to return to the primary. If you paid close attention to the source code of the 'buttonPressed:' methods in MultiAppDelegate.m and Item1ViewController.m you probably noticed that the title of this button should be "Done" since that's what we compare against. So drag a "Rounded Rect Button" from the "Inputs and Values" section of the Library Window (CMD-L) in IB  into the edit-window of the "View" object (the one with the simulated tab bar at the bottom).  After you have placed the button, double-click it and enter the text "Done".

File's owner

Item1ViewController.xib will be used to initialise our class ItemViewController, so we should change the class of the "File's owner" object to that class. Do this by selecting "File's owner", press CMD-4 and choose "Item1ViewController" from the Class drop-down menu. After selecting this, you should see that our action 'buttonPressed:' appears in the "Class actions" section just below the Class drop-down menu. Selecting the class of the "File's owner" thus gives us access to all the stuff we have defined for the class.

That's good, because we need to connect the "View" object to our view controller's view-property, so CTRL-drag from "File's owner" to "View" and select 'view' in the window that pops-up.

We also need to make "File's owner", or actually our Item1ViewController, the target of the "Done-button's" default action, so CTRL-drag from "Rounded Rect Button" to "File's owner" and select 'buttonPressed:' in the window that pops up.

Test run

Save everything in IB (CMD-S) and go back to XCode to build and run (CMD-Return). The application should appear in the iPhone simulator shortly and you should see the primary screen consisting of a white screen with a button called "TabBar". Press it and the secondary screen should appear, containing a tab bar controller with a single item should appear. In the view of the first item should be a button called "Done". Press it and you should return to the primary screen.

If you take a look in XCode's console window (CMD-R), you should see something like this:

[Session started at 2009-05-08 16:39:14 +0200.]
2009-05-08 16:39:20.278 Multi[28085:20b] MultiAppDelegate: buttonPressed:sender=0x525800, title=TabBar
2009-05-08 16:39:22.110 Multi[28085:20b] Item1ViewController:buttonPressed:sender=0x536e30, title=Done
2009-05-08 16:39:22.111 Multi[28085:20b] MultiAppDelegate: buttonPressed:sender=0x536e30, title=Done

Notice how the "Done"-button generates two entries in the console log. The first is from the 'buttonPressed:' method in Item1ViewController and the second is from 'buttonPressed:' in MutlAppDelegate since Item1ViewController calles MultiAppDelegate after it has processed the action.

Tuesday, April 28, 2009

iPhone tutorial: Adding ui controls to a view and handle the events/actions

This tutorial could have been called "Navigation Controller from Scratch, part 2" since we're going to continue from the point where we ended that tutorial, but I decided against it since I wanted a more representative title.

Originally, I didn't plan to write a part two, but I thought it was pretty boring to leave you with just a navigation controller and some view controllers. Therefore I thought, why not add some "controls" to make things more interesting? If you wonder what a control is, it is a collective name for buttons, sliders, etc. that are "used to convey user intent to the application" as the API docs for UIControl states it. Speaking about the API docs for UIControl, that document contains some valuable information for understanding how controls "communicate" with the applicaiton - especially the "The Target-Action Mechanism" section - so go ahead and read it right now if you want to.

So, start by loading the "WinNav" project that we created in the last part into XCode. The first thing we're going to do is to undo some things we did in the first part. Double-click on Resources/MainWindow.xib to start Interface Builder (IB) and load the xib-file into it. As always, remember to check that the MainWindow.xib file in IB is in hierarchical view mode by clicking the middle  button above the text "View mode" in the upper left corner of the window.

Select "Win Nav App Delegate" and CTRL-click on it. This should pop up a window showing all the outlets, etc. of the object. Scroll down to the "Received Actions" section and disconnect the 'next' and 'next2' actions by pressing the small "x" to the left of the "Rounded Rect Button".

If you are really observant you probably wondered why we never used the 'button' and 'button2' outlets in the last part, although we took ourselves the time to connect them. We did this to demonstrate how to make it possible, if required, to get a reference to an object created in IB by letting IB assign a value to a pointer that we defined in the source code.

WinNavAppDelegate.h

In this part we will need references to IB objects since we're going to play with controls that send "actions" to us (calls methods) and it's always nice to see exactly which object it was that sent us an action. So how do we find out which control that sent us an event? It's pretty simple since controls can send three "types" of actions to us, or actually provide 0, 1 or 2 arguments when calling the method associated with an event:

- (void)action
- (void)action:(id)sender
- (void)action:(id)sender forEvent:(UIEvent *)event

As you can see, one of the arguments is called 'sender' and that is actually the pointer to the object which sent the action. You probably remembered that we defined two actions - 'next' and 'next2' - in the last part using the following lines in WinNavAppDelegate.h:

- (IBAction)next;
- (IBAction)next2;

Neither of these take any arguments so we shoud edit them to make them look like this:

- (IBAction)next:(id)sender;
- (IBAction)next2:(id)sender;

Now we are defining that we are ready to receive two different actions, each taking one argument; the sender of the action.

WinNavAppDelegate.m

Since we changed the definition in the h-file we need to do the corresponding change in the m-file, so open up WinNavAppDelegate.m, scroll down to the 'next' and 'next2' methods and edit them to make them look like this:

- (IBAction)next:(id)sender {
NSLog(@"next: sender=%p, button=%p, button2=%p", sender, button, button2);
[navigationController pushViewController:viewController2 animated:YES];
}

- (IBAction)next2:(id)sender {
NSLog(@"next2: sender=%p, button=%p, button2=%p", sender, button, button2);
[navigationController pushViewController:viewController3 animated:YES];
}

Now the method implementation also take one argument, 'sender', and we have also added a call to NSLog() to log some diagnostic output to the console which will make us understand things better. What the NSLog() calls does is to indicate which method that is executing ('next:' and 'next2:' in the beginning of the string), then output the value of the 'sender' argument (a pointer, therefore the %p format specifier) and after that output the value of the 'button' and 'button2' pointers (%p format once again).

Build the project (CMD-B) to verify that there are no compilation errors, then double-click on Resources/MainWindow.xib to go back to IB.

Reconnecting things

Since we disconnected the 'next' and 'next2' actions during the cleaning up phase in the beginning of this post, we need to reconnect them to make things work again. But hey, why did we disconnect them, if we're now going to reconnect them. Seems kind of stupid, doesn't it? Yes, it does, if it wasn't for the fact that we changed the IBAction defintions in WinNavAppDelegate.h. Therefore, CTRL-drag from "Round Rect Button (Second)" to "Win Nav App Delegate" to connect it to the 'next:' event in the small window that pops up. If you are super-observant you probably noticed the colon (":") at the end of the event name 'next:'. That colon indicates that this event/action takes an argument. That's the 'sender' argument we added in the IBAction definition. By reconnecting the button we tell it to include the 'sender' argument, which it otherwise wouldn't have done and that would have lead to a runtime error since we longer have a zero-argument action defined in our source code. Finish off by reconnecting the "Round Rect Button (Third)" object to the 'next2:' event.

Test run!

Yes, it's time for a test run again - how fun! Remember to save the MainWindow.xib in IB by pressing CMD-S and then go back to XCode to build and run (CMD-Return). When the simulator is brought to the front, don't do anything before bringing XCode's console window to the front. Do this by selecting the source code window in XCode and press CMD-R. Press the "Second" button to move to the second view controller and then the "Third" button. This produce something like the following in the XCode console window:

2009-04-28 20:26:35.553 WinNav[13158:20b] next: sender=0x526aa0, button=0x526aa0, button2=0x523630
2009-04-28 20:26:36.784 WinNav[13158:20b] next2: sender=0x523630, button=0x526aa0, button2=0x523630

Notice that the value of the 'sender' argument is different in the two lines? In the first line ('next:') the sender value is equal to the button value and in the second line ('next2:'), the sender value is equal to the button2 value. The values you see here are hexadecimal representations of the pointers for the objects involved in the actions. So how do we interpret this information? It's really pretty logical. In the first line ('next:') the action was sent by the 'button' object which is "Rouded Rect Button (Second)" since we connected it to the 'next' event above. In the second ('next2:') it's the "Rounded Rect Button (Third)".

Cool, this means that we can find out which IB created object that sent us an action. If we have connected that IB object to a pointer in our code we can even make intelligent decisions based on the sender of an action since we know exactly which object it was. This probably means that we could have a single IBAction method which handles both of our "next"-buttons. If it is the "(Second)"-button, we push viewController2 and if it is the "(Third)" we push viewController3, but that I leave as an exercise to the reader. But please wait until after the tutorial to test that so we can continue the discussion using a common source code :)

Adding a slider

WinNavAppDelegate.h

Add the following line to the near end of the file, just above the @end-marker.

- (IBAction)slider:(id)sender;

That line defines an IBAction with one argument, the sender of the action. Since we're just going to use one slider, you might wonder what we need the sender argument for. This is because we want to be able to read the value of slider, that is, how far to the left or right it has been slided. For that we need the pointer to the UISlider object and that is exactly what we get in the 'sender' argument.

WinNavAppDelegate.m

Add the following line to the near end of the file, just above the @end-marker.

- (IBAction)slider:(id)sender {
NSLog(@"slider: sender=%p value=%f", sender, ((UISlider *)sender).value);
}

Here is the implementaiton of the argument. The only thing it does is log some diagnostic information to the console by calling NSLog(). If you check the API docs for UISlider you'll see that it has a property called 'value' which contains the value of the slider between 0.0 and 1.0 (0 to 100%). The "((UISlider *)sender)" magic is standard Objective C syntax for converting an "untyped" pointer into a "typed" pointer. To be able to access the UISlider class' property 'value' we need to work with a UISlider object. The compiler doesn't know that "(id)sender" is a pointer to an UISlider object, so we have to tell it. That's what the magic is used for. Build the project (CMD-R) to save all files and see that there are no compilation errors.

MainWindow.xib

Now that we have prepared the source code for adding a slider, we should add the slider in IB as well. Go to IB and double-click on the "View" object under the "View Controller (First)" object. This should bring up the edit window for that view. Drag a slider from the "Inputs & Values" section in the Library window (CMD-L) anywhere onto the view. Check the MainWindow.xib window to verify that the object appeard under the "View" object - it should be called "Horizontal Slider".

Now we need to connect the slider to our IBAction. You can do this by CTRL-dragging from "Horizontal Slider" to "Win Nav App Delegate" and connect it to the 'slider:' event. Did you notice the colon which indicates that this event takes one argument (the sender)? However, ther are two other ways of doing this in IB. CTRL-click on "Horizontal Slider" to pop up a window showing all its outlets, etc. Scroll down to the end and you should see a row called "Values changed". At the far end of that row there is a small circle. CTRL-drag this circle to "Win Nav App Delegate" to achieve the same result. Did you notice how the pop up window was made semi transparent in order to "get out of the way"? The third way of doing this is to select "Horizontal Slider" and press CMD-2 to bring up the Connections tab of the Inspector window. Here you'll once again see the "Values changed" row with the circle at the right end and yes you guessed it, this circle can also be CTRL-dragged!

Test run, test run, test run!

Ok, ok, we'll do a test run again. In fact, this is the final test run since we're done! Remember to save the IB file (CMD-S) and then go to XCode to build and run (CMD-Return). Bring up the XCode console (CMD-R) once the simulator has appeared and then play a little with the slider and you'll see something like this in the console:

2009-04-28 20:57:46.238 WinNav[13253:20b] slider: sender=0x523620 value=0.500000
2009-04-28 20:57:46.472 WinNav[13253:20b] slider: sender=0x523620 value=0.489474
2009-04-28 20:57:46.504 WinNav[13253:20b] slider: sender=0x523620 value=0.478947
2009-04-28 20:57:46.521 WinNav[13253:20b] slider: sender=0x523620 value=0.468421
2009-04-28 20:57:46.555 WinNav[13253:20b] slider: sender=0x523620 value=0.457895
2009-04-28 20:57:46.622 WinNav[13253:20b] slider: sender=0x523620 value=0.447368
2009-04-28 20:57:46.731 WinNav[13253:20b] slider: sender=0x523620 value=0.447368

See how the values decreased? That's because I slided to the left - towards zero. Pretty amazing huh and it wasn't even that hard!

Monday, April 27, 2009

iPhone tutorial: Navigation Controller from Scratch

In this post, we're going to test if we really understood what we learned in the previous parts. Those parts focused on analyses, but this time we're going to focus on synthesing, that is creating something of instead of just understanding. We're going to create a navigation controller which handles three custom made view controllers and provide the means to navigate between them. The title says we're going to start from scratch, but we're actually going to start from XCode's "Window-Based Application" template ,which is pretty close to "from scratch".

Start up XCode, choose "File/New Project" from the menu, select "Window-Based Application" and name it "WinNav". After XCode has done it's magic, we have the following project structure.

WinNav
  Classes
    WinNavAppDelegate.[hm]
  Resources
    MainWindow.xib
    Info.plist

When we're using Interface Builder (IB) to create objects for us, we should usually start by defining Objective C pointers in the source code and then use IB to "connect" the objects to the pointers. When the application is launched, the IB file loading procedure will actually assign values to the pointers.

Classes/WinNavAppDelegate.h

As was stated initially, we're going use a navigation controller to navigate between three custom view controllers. Furthermore, we're going to add "next"-buttons on the two first view controllers which will take us to the next view controller. Therefore, we start by declaring a navigation controller, three view controllers and two buttons - pretty logical, huh? How do we do this? Simple, open WinNavAppDelegate.h in XCode and add the following lines after the "UIWindow *window" line that came with the template:

// DON'T ADD THE FOLLOWING LINE - JUST USED FOR REFERENCE!!!
UIWindow *window;

// navigation controller
UINavigationController *navigationController;

// view controllers
UIViewController *viewController;
UIViewController *viewController2;
UIViewController *viewController3;

// buttons
UIButton *button;
UIButton *button2;


Since we're going to manipulate all these objects from IB, we have to declare them as properties (to make them accessible to external classes) as well as declare them as IBOutlets so that IB will detect them, when it scans our class defintion files. We do this by adding the following block of code after the 'window' property that came with the template.

// DON'T ADD THE FOLLOWING LINE - JUST USED FOR REFERENCE!!!
@property (nonatomic, retain) IBOutlet UIWindow *window;

// navigation controller
@property (nonatomic, retain) IBOutlet UINavigationController *navigationController;

// view controllers
@property (nonatomic, retain) IBOutlet UIViewController *viewController;
@property (nonatomic, retain) IBOutlet UIViewController *viewController2;
@property (nonatomic, retain) IBOutlet UIViewController *viewController3;

// buttons
@property (nonatomic, retain) IBOutlet UIButton *button;
@property (nonatomic, retain) IBOutlet UIButton *button2;
- (IBAction)next;
- (IBAction)next2;


If you've read the previous posts all this should be pretty straight forward to you, but you might have forgotten what the strange IBAction stuff is all about. An action is a way to associate an UI-event (touching a button for example) with an action (a method in a class).

Classes/WinNavAppDelegate.m

We declared a bunch of properties in the h-file, so the first thing we should do is to add matching @synthesize-instructions to actually create the code required to implement the property specifications.

// DON'T ADD THE FOLLOWING LINE - JUST USED FOR REFERENCE!!!
@synthesize window;

// navigation controller
@synthesize navigationController;

// view controllers
@synthesize viewController;
@synthesize viewController2;
@synthesize viewController3;

// buttons
@synthesize button;
@synthesize button2;


Ok, now that the properties are implemented, we should implement the action methods we declared using the IBAction statements in the h-file. Add the following lines to the end of the m-file, just above the @end-statement.

- (IBAction)next {
[navigationController pushViewController:viewController2 animated:YES];
}

- (IBAction)next2 {
[navigationController pushViewController:viewController3 animated:YES];
}


The 'next' method will be associate with the "next"-button on the first view controller and the "next2"-button will be associated with the "next"-button on the second view controller. Both these methods do the same thing, they "push" a view controller onto the navigation controller, which automatically (thanks to the navigation controller) will take us to the new view (the one we push). The button on the first view takes us to the second view and the button on the second view takes us to the third. Moving "backwards" is automatically handled by the navigation controller thanks to an automatically added "back"-button in the top left corner.

To make all the stuff we have declared visible once we start the application, we need to add the navigation controller's view to our window. We do this by adding a 'addSubView' method call in the 'applicationDidFinishLaunching' that came with the template:

// navigation controller
[window addSubview:[navigationController view]];

// DON'T ADD THE FOLLOWING LINE - JUST USED FOR REFERENCE!!!
[window makeKeyAndVisible];


Resources/MainWindow.xib

Now that we've prepared our source code for what we want to do, it's time to make an IB file which creates all the objects for us, so double-click on Resources/MainWindow.xib to load the file into IB. Switch to hierarchical view mode in the MainWindow.xib window in IB, by pressing the middle icon just above the "View mode" text in the upper left corner of the window. This should present the contents of the file as:

File's Owner [UIApplication]
First Responder [UIResponder]
Win Nav App Delegate [WinNavAppDelegate]
Window [UIWindow]

To really see if we understand how to use IB, we'll start by deleting the last two objects by selecting them and press backspace.

Win Nav App Delegate

So how do we re-create the "Win Nav App Delegate" object? Choose Tools/Library from the IB menu or press CMD-L. Select "Cocoa Touch Plugin" from the Library window and then "Controllers". Scroll down to the Object-icon and drag it into the MainWindow.xib window. It should be automatically selected so press CMD-4 to bring up the Identity tab of the Inspector window. Change the class to WinNavAppDelegate (our class) and you should see how the list of outlets get populated in the "Class outlets" section; all our buttons and view controllers as well as the window and navigation controller should be present. You should also see our two actions 'next' and 'next2' in the "Class actions" section.

Connect the "Win Nav App Delegate" to the 'delegate' property of "File's Owner" by selecting "File's owner" and CTRL-dragging from it to "Win Nav App Delegate". A blue line should appear and when you release the mouse button a window called "Outlets" should appear. Select 'delegate' from it. CTRL-click "Win Nav App Delegate" and then "File's Owner" to verify that the 'delegate' outlet is correctly connected. 

Window

Let's re-create the "Window" object, by going to the "Windows, Views & Bars" branch in the Library window. Drag the Window icon into the MainWindow.xib window. Connect the Window to the 'window' property of "Win Nav App Delegate" by selecting "Win Nav App Delegate" and CTRL-dragging from it to "Window".

Navigation Controller

What's next? Well, we need a navigation controller so select the "Controllers" branch in the Library window again. Drag the "Navigation Controller" into the MainWindow.xib window. See the small arrow to the left of the newly added object? Press it to expand the hierarchy under the controller and you should see a "Navigation Bar" object and a "View Controller (Navigation Item)" object. Yep, there's another small arrow to the left of this object, so press that as well. Look, a "Navigation Item (Navigation Item)" object appeared. IB apparently did a lot of work for us when we drag and dropped the "Navigation Controller" icon. Even if this is a "from scratch" tutorial we're going to accept this help since we'll be adding two more view controllers by ourselves soon. Connect this to the 'navigationController' outlet of "Win Nav App Delegate" by CTRL-dragging from "Win Nav App Delegate" to "Navigation Controller" and select the 'navigationController' outlet.

Navigation Bar

Automatically created when we dragged the "Navigation Controller" icon from the Library Window. This is used "internally" by the "Navigation Controller" and shouldn't be manipulated.

View Controller (Navigation Item)

Automatically created when we added the "Navigation Controller from the Library. It's a simple UIViewController, but CTRL-click it to see that it's 'navigationItem' property is connected to the "Navigation Item (Navigation Item)" object. This object was placed "under" the "Navigation Bar" object thanks to some special handling in IB - navigation controllers are prepared for it.

Navigation Item (Navigation Item)

Also automatically created by IB. This object was placed "under" the "View Controller" also thanks to some special handling in IB. It is used to display the title and navigation buttons of the "View Controller". Double-click it to bring the "edit window" for it to the front. Double-click the text "Navigation Item" at the top and change it to "First". Notice how the text "(First)" replaced ("Navigation Item)" in the MainWindow.xib window, both for the "Navigation Item" and the "View Controller".

A first test run

Let's take a brief pause and save our IB file (CMD-S), return to XCode to build and run (CMD-Return) and wait for the iPhone simulator to start. You should see a white background with a blue bar at the top saying "First". That's the title of the view controller that was automatically added by IB.

View Controller (Second)

To create this object, bring up the Library window in IB (CMD-L) and drag a "View Controller" icon from the "Controllers" section to the end of the list of objects in the MainWindow.xib window and drop it there. We should create a similar hierarchy as for the automatically created view controller so drag the "Navigation Item" icon from the "Windows, Views & Bars" secion in the Library and drop it onto the newly added view controller. It should "swallow" it so that it appears "under" it instead of just "below" it. Double-click the newly added navigation item to bring up the edit window for it and then double-click the "Title" text and change it to "Second".

Connect the newly created view controller object, by CTRL-dragging from the "Win Nav App Delegate" object to the "View Controller (Second)" object and choose the 'viewController2' outlet from the menu that pops up.

View Controller (Third)

Repeat the steps from above, but name it "Third" instead. Easy, huh?

Adding views

View controllers without views are pretty boring, so we'll add a view to each of our controllers. There are two ways of doing this. Either you drag the "View" icon from the "Windows, Views & Bars" section of the Library onto the appropriate "View Controller" object in the MainWindow.xib window or you double-click the appropriate "View Controller" object in the MainWindow.xib window to bring up the edit window and then drag the "View" icon into the edit window (the big area that says "View). Go ahead and try both alternatives.

Adding buttons

The navigation controller automatically provides a means for moving "backwards" among its view controllers, just like a "Back" button in a web browser, but it does not provide a "Forward button". Therefore, we have to provide our own. We need one button on the first view controller so we can get to the second and one on the second so we can get to the third.

Double-click on the first view controller (the one IB automatically added for us under the navigation controller) to bring up its edit window. As an alternative, you could also double-click on the view controllers view that we added above. Now, drag the "Round Rect Button" icon from the "Inputs & Values" section of the Library window (CMD-L) and drop the icon anywhere in the view controllers edit window that we just brought up. Don't drop it on the blue navigation bar at the top, though. Double-click the newly added button and name it "Second".

Connect the newly created button by CTRL-dragging from "Win Nav App Delegate" to the button and select the 'button' outlet from the menu that pops up.

Repeat the steps for the second view controller but name the button "Third" and connect it to the 'button2' outlet instead.

Time for a test run again

Save the IB-file (CMD-S) and go to XCode to build and run (CMD-R). You should see a white screen with the title "First" in the blue navigation bar at the top and a button titled "Second". That's pretty cool, but hey nothing happens when we press the button! What kind of tutorial is this? 

Bringing the buttons to life

Expand the hierarchies for the first and second "View" objects in the MainWindow.xib window by pressing the small arrow that appeared to the left of them when we added the buttons to them. You should see that a "Rounded Rect Button (Second)" and "Rounded Rect Button (Third)" have been added to the object hierarchy.

Select the first button in the MainWindow.xib window in IB and CTRL-drag to "Win Nav App Delegate" button. A small window named "Events" should pop up displaying the two IBActions 'next' and 'next2' we defined in Classes/WinNavAppDelegate.h. Choose 'next'.

Repeat the steps for the second button, but choose 'next2' from the list of events instead.

Time for another test run!

Save the IB-file (CMD-S) and go to XCode to build and run (CMD-R). Try to press the "Second"-button to see what happens! Whoa! That's amazing! Look at those smooth movements! Now try pressing the "Third"-button and see how we switch to the third view controller - pretty amazing, right? But that's not all, try pressing the "Second"-button in the upper left corner of the screen - inside the navigation bar. Yeah, that's a "Back"-button which takes us to the previous view controller. So now you can navigate freely between the three view controllers. Not bad, huh? ;)